



Written by Rick Kovac, COO of Golden Lighting
The takeaway: A large or two-story entryway isn't sized by drama — it's sized by ceiling tier, footprint, and a hard 7-foot walking clearance, with the fixture's vertical presence and any supporting sconces or uplights built around those numbers rather than around how tall a chandelier can look in a photo.
Key takeaways:
- Match the fixture family to the ceiling tier first — flush and semi-flush for 8 to 9 feet, pendants and chandeliers for 10 to 12 feet, and a real statement chandelier plus supporting wall light for 14 feet and up — then size the diameter from the room's footprint.
- Keep at least 7 feet (84 inches) of clearance from the floor to the fixture's lowest point in every walking area. This is a hard minimum, not a starting suggestion, and it doesn't change with ceiling height.
- A single statement chandelier works under about 12 feet of ceiling; above 14 feet, or across a wide footprint, plan sconces and uplights as a separate layer so the upper walls and architecture don't go dark around the fixture.
- Treat manufacturer lumen output, specific lux targets, and precise height-ratio formulas from outside sources as a starting point to verify on-site, not a substitute for checking the actual room, door swing, and stair sightlines.
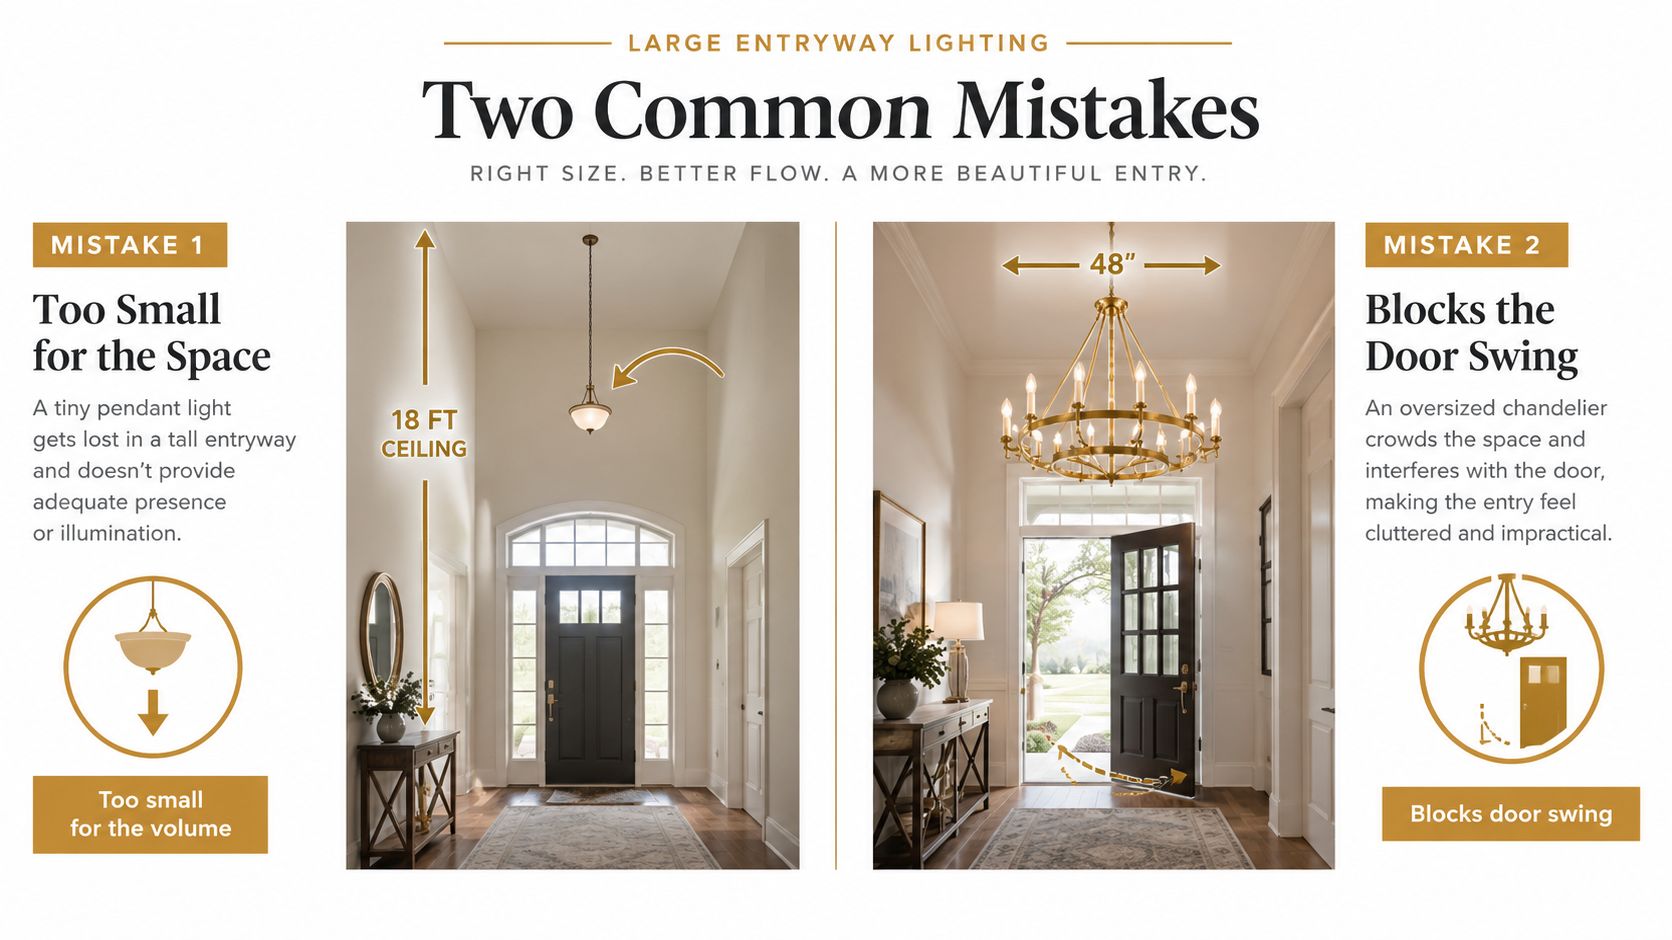
A foyer can be beautifully furnished and still feel wrong the moment someone walks through the door. A tiny pendant disappears beneath a tall ceiling, while an oversized chandelier can crowd the entry path and compete with the door. The fix isn't a more dramatic fixture by default. It's a lighting plan built around ceiling height, footprint, clearance, and the way people move through the space.
At Golden Lighting, large entryway lighting is treated as an engineering and proportion problem before it becomes a style decision. The right fixture should welcome guests, reveal stairs and thresholds, support the architecture, and still look intentional when viewed from the rooms beyond the foyer.
Why Most Large Entryways Look Either Flat or Overstuffed
A small bowl pendant beneath an 18-foot ceiling looks stranded. It may provide light, yet its visual mass cannot balance the vertical volume. A chandelier chosen by diameter alone creates the opposite problem, interfering with the door swing or crowding the circulation path.
The missing variable is ceiling tier. An 8-foot foyer and a 20-foot great-room entry require different proportions, fixture families, and placement decisions. Treat the two-story foyer as its own design problem, then build the lighting around its height rather than stretching a standard foyer plan upward.
Three ceiling tiers drive the decision
- Standard ceilings, 8 to 9 feet: Flush and semi-flush fixtures preserve head clearance and keep the room open. A substantial semi-flush mount can still establish a focal point without placing a pendant in the walking zone.
- Mid-height ceilings, 10 to 12 feet: Pendants, chandeliers, and larger semi-flush fixtures become practical. This tier supports more drop, stronger shadows, and a clearer silhouette without making the fixture feel low.
- Double-height ceilings, 14 feet and up: A two-story foyer needs real vertical presence. Entries reaching 18 to 20 feet should be evaluated as tall-volume spaces, not ordinary foyers with a longer rod. Use the chandelier as the anchor, then add wall lighting or upper-level illumination so the surrounding architecture does not disappear.
Brightness also belongs in the first decision, but treat any precise lumens-per-square-foot figure you find online as a starting estimate rather than a spec — foyer size, ceiling height, wall color, and how much daylight the space gets all change what actually reads as well-lit. Confirm the fixture's rated output and distribution in its own manufacturer specifications, then adjust on a dimmer once it's installed, rather than relying on appearance or a generic formula alone.
Proportion rule: Choose the ceiling tier first, then the fixture family, then the diameter and drop. Reversing that order causes most foyer sizing mistakes.
The tier also controls the surrounding plan. Coordinate mirrors, a console table, sconces, and other entry furnishings with the fixture's scale. In a rental, plug-in sconces and portable lamps can supply that supporting layer without opening the walls.
Sizing the Fixture to Your Ceiling and Footprint
A two-story foyer needs its own proportion rules. Start with the footprint, then adjust for ceiling height, architecture, and the view from the stairs or upper landing. The standard room-addition formula remains useful: add the room's length and width in feet, then use that total as the approximate fixture diameter in inches. A 14-by-18-foot foyer points to a 32-inch fixture, while a 20-by-24-foot entry points to 44 inches, following the method in Golden Lighting's chandelier sizing guide.
That result sets diameter only. Ceiling height determines how much vertical presence and drop the fixture can carry.
Work through each ceiling tier
An 8-foot ceiling usually calls for a flush or semi-flush fixture. Use the room-addition formula to establish a diameter, then keep the fixture close to the ceiling. Maintain at least 7 feet, or 84 inches, beneath a pendant or chandelier wherever people walk — this is Golden Lighting's hard clearance minimum, and it doesn't flex for style.
A 10-foot ceiling supports a fuller pendant or chandelier. A 10-by-12-foot foyer produces a starting diameter of 22 inches. Golden Lighting's fixture-height standard adds 2.5 to 3 inches of fixture height for every foot of ceiling height above that baseline, creating a range of roughly 25 to 30 inches of fixture height for a 10-foot ceiling.
At 14 feet, retain the footprint calculation but give the fixture more vertical presence. A substantial chandelier at this ceiling height commonly measures somewhere in the 32- to 48-inch range, depending on the architecture, sightlines, and surrounding wall height.
For an 18-foot or taller ceiling, increase the footprint-derived diameter only when the architecture can carry it. In a two-story foyer, some designers increase the calculated result by roughly 20 to 30 percent, while the room-addition formula remains the starting point.
Quick reference for common foyer conditions
| Foyer Footprint (L x W) | Ceiling Tier | Chandelier Diameter | Drop Range |
|---|---|---|---|
| 10 x 10 feet | Standard, 8 to 9 feet | 20 to 24 inches | Flush or semi-flush, with at least 7 feet of floor clearance |
| 10 x 12 feet | Mid-height, 10 to 12 feet | About 22 inches | About 25 to 30 inches from ceiling |
| 14 x 18 feet | Double-height, 14 feet and up | About 32 inches, increased when volume requires | About 5 to 7 feet from ceiling, subject to clearance |
| 20 x 24 feet | Tall double-height, 18 feet and up | About 44 inches, with a possible 20 to 30 percent increase | One-quarter to one-third of ceiling height, subject to stair and door clearance |
Use the table as a starting point, not a substitute for reading the architecture. Keep the fixture visually subordinate to the door opening and circulation route — a practical guideline is to keep the fixture narrower than the door opening itself, while keeping it clear of the doorway and its swing.
In a two-story foyer, diameter alone will leave the upper volume unfinished. Plan the chandelier with sconces, stair lighting, or upper-level illumination so the walls do not disappear around it. Renters can create that supporting layer with plug-in sconces and portable lamps, avoiding new wiring while preserving the intended balance.
Hanging Height Rules for Tall Foyers
The familiar 7-foot clearance rule protects people walking beneath a fixture, but it does not solve the proportion problem in a two-story foyer. A chandelier can meet that minimum and still sit so high that it loses contact with the room.
Start with the full ceiling-to-floor distance. In a tall foyer, one common design convention is to place the fixture's lowest point roughly one-quarter to one-third of that distance down from the ceiling, treating this as a visual-proportion guideline distinct from the clearance minimum below. On a 20-foot ceiling, that puts the lowest point somewhere between about 13 feet 4 inches and 15 feet above the floor, depending on the drop chosen.
Treat that range as a starting point to mock up in the actual room, not a fixed formula — it still has to clear the 7-foot walking minimum, and it needs to be checked against the door swing, stair movement, and the sightline from the front door.
Avoid both extremes
A flush mount leaves the vertical center of a tall foyer empty. It may be safe, but it will not anchor the volume. A chandelier hung too low can block the staircase, interrupt the view from the front door, or compete with a balcony rail.
- Balcony and stair constraints: Keep the fixture at least 6 inches clear of a stair landing or balcony rail as a practical architectural safeguard.
- Walking clearance: The lowest point must remain at least 7 feet, or 84 inches, above the finished floor wherever guests pass beneath it. This is a hard minimum in every walking area, regardless of ceiling height or fixture style.
- Door operation: Door swing and sightlines override the visual formula. If a chandelier catches a door or crowds the entry, its placement is wrong.
A foyer has no tabletop or place setting to anchor the fixture the way a dining room does, so use the floor, door, stairs, railing, and central arrival axis as the reference points instead.
Mock the proposed lowest point with a temporary line before the electrician sets the final junction location. Check it from the sidewalk, open door, stairs, and rooms facing the foyer. In a rental, use the same test with a plug-in pendant or portable lamp before committing to a permanent fixture.
This short walkthrough shows the mock-up and measurement process in a real two-story foyer:
One Statement Piece or a Layered Lighting Plan
A two-story foyer needs its own proportion rules. A single chandelier can look polished in a restrained entry with a clear center and a ceiling below 12 feet. In a tall, broad volume, that same choice may leave the walls, console, artwork, and corners visually inactive.
Above 14 feet, especially in a wide entry or a 20-foot cube, plan the lighting in layers before selecting the centerpiece. Give the chandelier or pendant the central role, then assign sconces and low-level or reflected light to the surrounding architecture.
Choose the plan that matches the architecture
| Factor | Single Statement Chandelier | Layered Pendant + Sconces + Uplight |
|---|---|---|
| Best ceiling condition | Standard or mid-height ceilings, especially under 12 feet | Double-height ceilings and tall architectural volumes |
| Visual effect | One clear focal point | Depth across the center, walls, and lower edges |
| Installation | Simpler electrical planning | Requires separate circuits and more coordination |
| Dimming | Straightforward, one primary control | More flexible, but each layer needs considered control |
| Cost | Usually more contained | Can rise with additional fixtures and installation |
| Main risk | Can feel isolated in a large volume | Can become visually busy without a finish or design strategy |
The footprint matters as much as the ceiling. A narrow two-story foyer usually needs one vertically strong chandelier with restrained wall light. A broad foyer with a console, mirror, artwork, and stairs benefits from illumination across several planes.
Design decision: Under 12 feet, choose one focal fixture and make it count. Above 14 feet, or across a wide footprint, build the layers before choosing the centerpiece.
Layering also gives the room better control through the day. The chandelier supports arrival and circulation, sconces soften the walls, and uplights bring out architectural surfaces. Golden Lighting's layered lighting guide provides a useful framework for assigning separate roles to each source.
Renters can apply the same logic without rewiring. Use a plug-in pendant as the central layer, then add portable lamps or plug-in sconces where the layout allows. Keep cords secured along walls and away from the walking path. The goal is the same visual balance, with a setup that can be removed later.
Finish coordination keeps multiple fixtures from looking accidental. A YEP by Golden mix-and-match approach can combine shades, finishes, and glass for a personalized scheme. Ziva by Golden suits a refined, showroom-forward specification where one fixture carries more architectural weight.
Sconces, Uplights, and How to Layer Around the Chandelier
A two-story foyer needs wall light at more than one visual level. Place sconces where they clarify the entry, then use uplights to reveal the height and materials around the chandelier. This keeps the upper volume connected to the floor instead of leaving the pendant isolated against a dark wall.
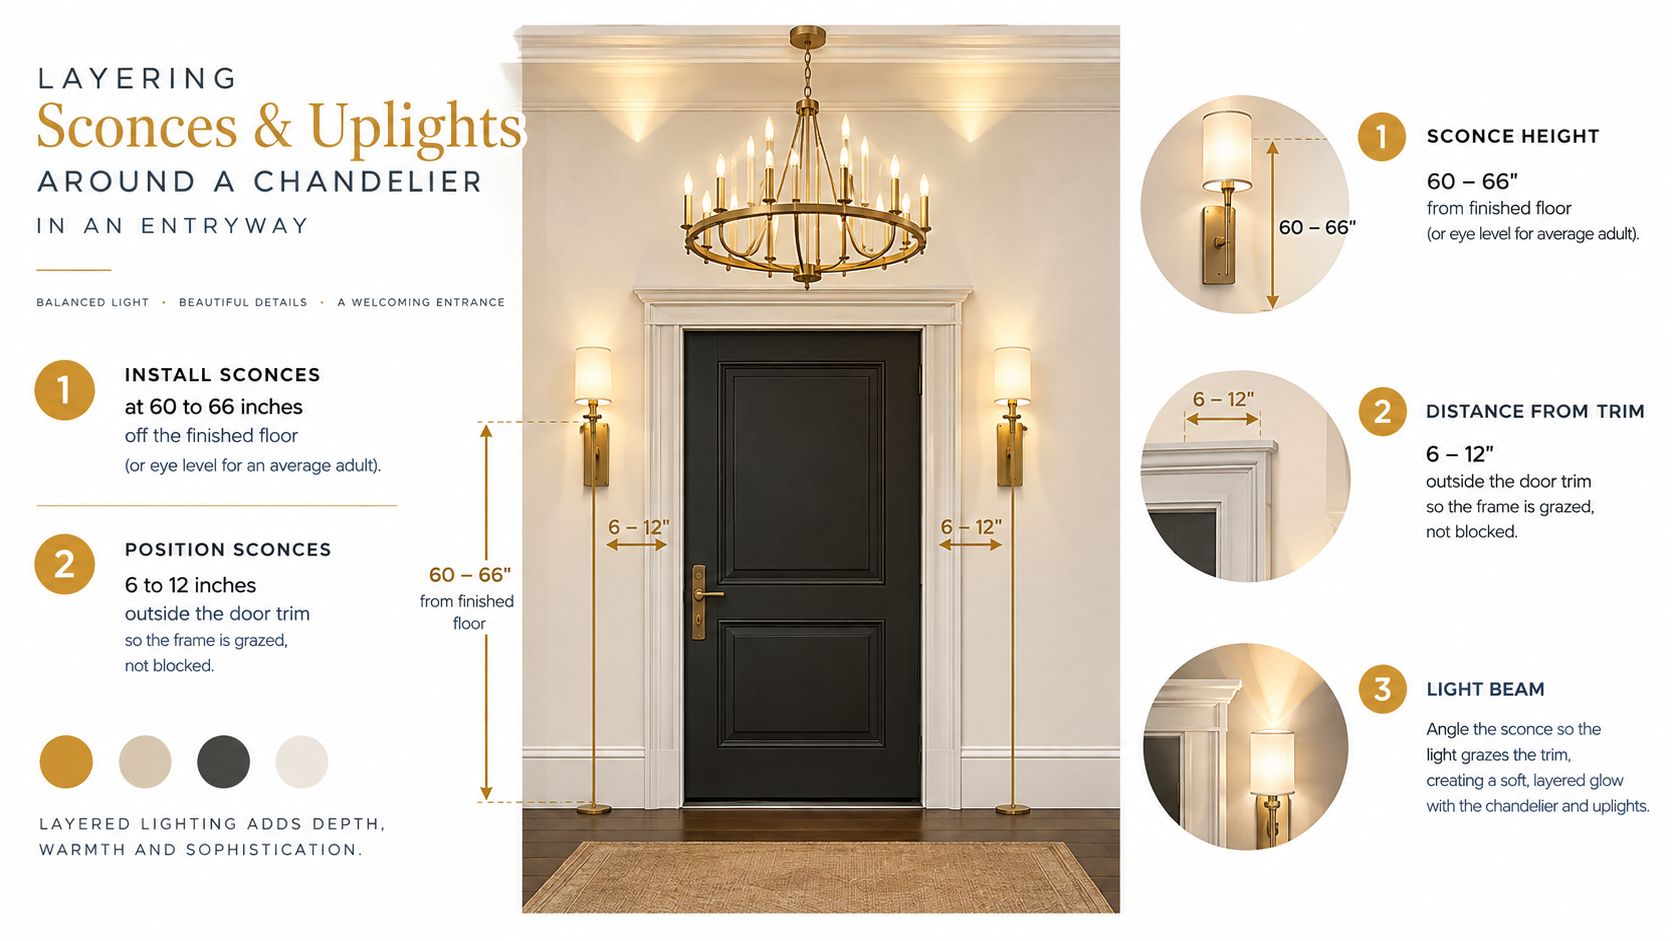
Set decorative entry sconces 60 to 72 inches above the finished floor — Golden Lighting's standard band for entry and hallway sconces — with 60 to 66 inches landing near average adult eye level for most installations. Position them just outside the door trim so they graze the frame without crowding it, adjusting only when a mirror, artwork, door swing, or unusual wall geometry demands it. The fixture should light faces and trim without shining directly into anyone's eyes; because these pendants and sconces sit above eye level in an entry, a shielded or downward-shading design matters more here than in a room where a fixture hangs below eye level.
Let the wall light shape the arrival
Choose a shielded or downward-shading sconce instead of an exposed bulb aimed at eye level. Controlled, warm light gives the entrance a residential feel, while high-glare light makes the interior resemble a porch. Use matching sconces on either side of the door when symmetry strengthens the architecture. Use a single fixture or a staggered arrangement when the wall includes stairs, artwork, or a console.
Uplights serve a separate purpose. Place one at the base of a console, inside a plant pot, or in a floor recess aimed at stone or a stair surface. Each position changes the emphasis:
- Console base: Adds a low glow beneath furniture and keeps the lower wall visible.
- Plant pot: Gives foliage a soft vertical silhouette without adding a prominent fixture.
- Floor recess: Washes a stone wall or stair surface and reinforces the architecture.
Put the chandelier on one circuit and the sconces on a separate dimmer. That arrangement lets the central fixture handle arrival and circulation while the wall light shifts lower for evening use. Review interior wall sconces before fixing junction-box locations, especially when comparing shade depths and light distribution.
Renters and renovation-constrained homes can use the same layers without opening walls. A plug-in pendant can provide the central glow, while plug-in sconces or portable lamps support the walls, with cords secured along the wall and outside the walking route. The result will not match a fully wired scheme in every detail, but it can preserve warmth, glare control, and proportion until permanent work is possible.
Brightness, Color Temperature, and Circulation Safety
Lumens describe what a fixture produces. How much of that light actually reaches the floor, stairs, and other surfaces is the more useful safety check in a circulation zone, and it depends heavily on ceiling height, fixture spacing, and wall color — treat any single published brightness figure as a rough benchmark to verify on-site, not a fixed target, since foyer conditions vary too much for one number to apply everywhere.
In a tall foyer, inspect the floor at the threshold, the stair nosings, and the area beneath the fixture. If those surfaces remain dim while the ceiling glows, add or redirect wall lighting rather than increasing chandelier output alone. A layered plan gives better control and reduces glare from a single bright source.
Use warmth to keep the volume residential
Set the color temperature between 2700K and 3000K, with 2700K as the classic choice for a foyer in Golden Lighting's residential lighting schedule. This range keeps wood, stone, painted surfaces, and metal hardware warm without making the foyer amber. A 4000K or higher source can make a residential entrance feel institutional, particularly when several fixtures operate together.
Stairs need a separate safety check. The first and last step should read clearly after dark. Dedicated step or riser lighting, or a strong uplight aimed from a side wall, may be necessary because a chandelier cannot reliably cover every tread and corner.
Choose bulbs and integrated LEDs with a CRI of 90 or higher, matching Golden Lighting's house standard across its LED products, so wood tones and brass hardware retain their depth. Put the main fixture on a compatible dimmer, then test full and reduced output at night. Renters can use dimmable plug-in fixtures to test brightness and placement before committing to permanent wiring.
Your Entryway Lighting Checklist and Next Steps
Large entryway lighting works best when you specify the two-story foyer in sequence. Treat its height and footprint as separate proportion problems, then coordinate the fixture with circulation and supporting light.
- Measure the foyer: Record length, width, ceiling height, door swing, stair location, and the walking route.
- Size the center fixture: Use the room's length and width to establish a starting diameter, then adjust for the foyer's tall volume and sightlines.
- Set the drop: Start near one-quarter to one-third of the ceiling height as a visual guideline, then confirm the fixture from the entry, stairs, and upper landing.
- Protect circulation: Keep at least 7 feet, or 84 inches, beneath the fixture wherever people walk — non-negotiable, regardless of the visual drop you land on.
- Plan the layers: Place sconces at useful eye level and direct uplights toward dark wall areas or architectural details. In a rental, test the arrangement with dimmable plug-in sconces or uplights before requesting permanent wiring.
- Set the atmosphere: Keep the source between 2700K and 3000K, then use a compatible dimmer to balance comfort and visibility after dark.
A layered plan usually serves a ceiling above 10 feet better than one pendant because it distributes light across the room's vertical levels. Compare Golden Lighting's chandelier, pendant, and sconce collections by finish, scale, and proportion, using your measurements rather than the catalog image alone.
If the budget allows one purchase, start with the correctly scaled central fixture. Add sconces and uplights in the next phase, and keep the wiring plan accessible for future adjustments.
Measure the foyer first, hold the 7-foot clearance as non-negotiable, then size the fixture to the footprint and the ceiling tier — a two-story entry gets its layered sconces and uplights, a standard one gets a well-chosen flush or semi-flush, and either way the door swing and stair sightlines get the final word.
— seen a lot of light fixtures in 80+ countries. Still learning what actually works in a home.












Share:
Flush Mount Ceiling Light Installation Guide
Where to Hang a Mirror Above Your Console — And Why the Light Above It Matters Too