



Written by Rick Kovac, COO of Golden Lighting
The takeaway: A flush mount installation is only as good as the junction box behind it — check box depth, structural support, and conductor space before you choose a finish, and call a licensed electrician the moment any of those three is in doubt.
Key takeaways:
- Most North American electrical codes treat flush-mount installation as a close-fit condition: in a noncombustible ceiling, the box's front edge can sit no more than 1/4 inch (NEC 314.20) behind the finished surface, or the canopy won't seat flat.
- A ceiling outlet box must be supported by an approved method and is generally expected to hold at least 50 pounds for a light fixture — a box supporting a ceiling fan needs its own separate listing and weight marking.
- The most common flush-mount failure isn't a bad splice — it's conductors and wire connectors crowded into the wrong part of the box, which keeps the canopy from sitting flush no matter how tightly it's screwed down.
- Missing junction boxes, aluminum wiring, damaged insulation, or a fixture that needs new structural support all mean it's time to call a licensed electrician, not push through with a bigger screwdriver.
A dark entryway, cramped hallway, or shadowed kitchen can make an otherwise finished home feel incomplete. A flush mount ceiling light offers a clean way to add illumination without sacrificing headroom, but the fixture swap isn't purely cosmetic. The junction box, ceiling support, wiring space, room clearance, and future service plan all determine whether the result looks polished and remains safe.
Golden Lighting treats lighting selection as a balance of design, engineering, and long-term usability. Before choosing a finish or shade, confirm that the ceiling can accept the fixture and that the existing electrical work is suitable for a permanent installation.
Why Your Existing Junction Box Dictates the Project
A modern flush mount may appear simple from below, yet its canopy must sit against a carefully aligned mounting surface. The common assumption is that an old fixture can be removed and a new one attached to the same box without further inspection. In practice, a recessed box can leave the canopy unsupported, create a visible gap, or place strain on the mounting screws.
A useful introduction to the fixture category appears in Golden Lighting's guide to what flush mount lighting is. The key distinction during installation is that the fixture's low profile makes box alignment more important, not less.
The small box-depth tolerance matters
For flush-mounted fixtures, most North American electrical codes treat the installation as a close-fit condition. Under NEC 314.20, in a finished noncombustible surface, the front edge of the box, plaster ring, extension ring, or listed extender must be set back no more than 1/4 inch (6 mm) from the finished surface. In wood or another combustible surface, the box or approved fitting must extend to the finished surface or project beyond it.
That tolerance affects two things at once:
- Safety: The electrical enclosure must remain properly positioned in relation to the finished ceiling.
- Fit: A flush canopy needs a stable, nearly level plane. A recessed box can prevent the fixture from seating fully.
A plaster ceiling, tile finish, or remodel can expose this problem. The original box may have been installed before the final surface was added, leaving it too deep for the new fixture. An approved extension ring or plaster ring can sometimes correct the alignment, but the fitting must be suitable for the box and installation method.
Practical rule: Don't choose the decorative fixture until the box depth has been checked against the finished ceiling.
What the box inspection reveals
Look for a box that is secure, level, undamaged, and rated for the luminaire. A mounting bracket that rocks, screws that don't engage properly, or a canopy that cannot sit flat indicates a preparation problem rather than a trim problem. The box also needs enough room for the conductors and connectors without forcing the canopy outward.
If the box is missing, loose, badly recessed, or attached only to weak ceiling material, the project has moved beyond a straightforward fixture replacement. A licensed electrician can identify the correct box, support method, and local code requirements before the new light becomes a cosmetic cover for an unsafe condition.
Preparing the Ceiling and Verifying Structural Support
Power should be shut off at the breaker before the old fixture is opened, and a non-contact voltage tester should be used to verify that the ceiling conductors are de-energized. A wall switch being off isn't enough protection because the box may contain more than one circuit or a conductor that remains live.
Preparation should happen in a deliberate order. The following checklist keeps the physical foundation ahead of the wiring work.
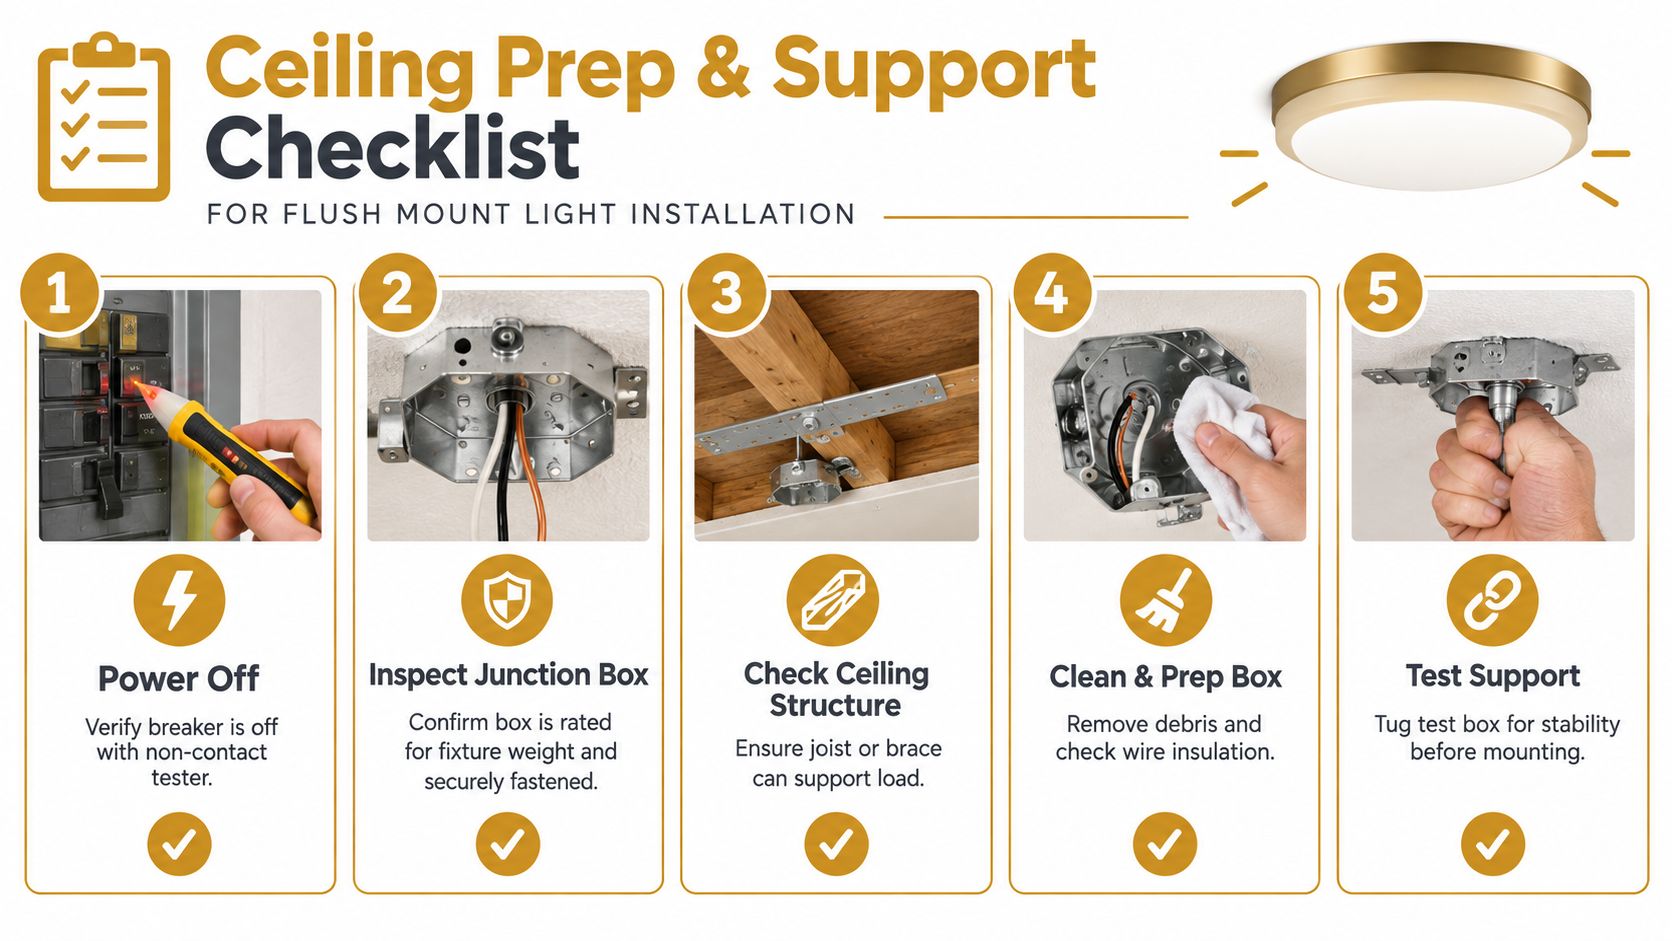
Inspect the support before touching conductors
A ceiling outlet box must be supported through an approved method. Depending on the installation, that can include fastening to a surface with adequate support, attaching to a structural member with a brace, securing to a finished surface with approved clamps or fittings, or connecting to suspended-ceiling structural elements with approved hardware, per NEC 314.23.
A gentle tug test can reveal movement, but it doesn't replace a structural inspection. If the box shifts, the mounting screws spin without tightening, or the ceiling finish cracks around the opening, stop and correct the support first.
The box should also be aligned with the finished surface, as covered above: if the front edge sits more than 1/4 inch behind a finished noncombustible surface, an appropriate listed extender or plaster ring is generally required. The solution must preserve box integrity and provide a solid plane for the fixture bracket.
A level mounting surface matters for more than code compliance — even a small tilt becomes obvious once a wide canopy meets a flat ceiling. That's worth checking closely on an older or previously remodeled ceiling, where a popcorn texture, a beadboard overlay, or a prior patch job can leave the surface less even than it looks from the floor.
Before installation, remove loose debris, inspect the insulation on the conductors, and confirm that the bracket holes match the box. Don't rely on drywall anchors to carry a ceiling fixture unless the fixture instructions and the approved installation method specifically allow them. The primary support should come from the box and its structural attachment.
Wiring Connections and Managing Conductor Space
Wire connections deserve attention, but the most frequent flush mount problem is often what happens afterward. A splice may be electrically secure while the canopy still refuses to sit flat because the conductors and wire connectors have been pushed into the wrong part of the box.
The standard residential arrangement is black to hot, white to neutral, and green or bare copper to ground, subject to the actual wiring condition and the fixture instructions. The Golden Lighting guide to ground wire connections provides useful context for the grounding portion of the work.

Make the bracket and splice work together
The mounting bracket should be attached securely and level before the fixture is lifted into place. Use the supplied fasteners where appropriate, and don't compensate for a loose box by overtightening the decorative screws. That approach can distort the bracket, damage the ceiling finish, or leave the fixture under uneven stress.
Prepare the conductors according to the manufacturer's instructions, make each splice with an approved connector, and secure the ground connection to the designated green screw, grounding lead, or approved grounding point. Older homes may have unusual colors, brittle insulation, or no usable grounding conductor. Those conditions require identification before a new fixture is connected.
The wire tuck is a fitting operation, not an afterthought:
- Position the splices: Keep connectors arranged so they don't sit directly behind the bracket or canopy edge.
- Protect the insulation: Avoid sharp bends, pinching, and contact with rough metal edges.
- Use the box volume: Fold conductors into the box without force. A crowded box can prevent full seating.
- Check the canopy: Hold it in position before final tightening. It should meet the ceiling evenly without pressure.
Check the fixture's instructions for its junction-box screw spacing before the wires are tucked away — this varies by fixture, and confirming it against the box up front avoids a last-minute surprise. If the canopy still bows or leaves a gap, stop. The likely causes are box depth, bracket alignment, or conductor congestion, not a need for more screw pressure.
Video: securing wiring connections and seating a flush mount canopy.
Once the bracket is stable and the conductors are neatly contained, attach the canopy, shade, or decorative trim according to the fixture instructions. Restore power only after the fixture is mechanically secured and the surrounding ceiling is clear.
Navigating Integrated LED and Modern Hardware Shifts
Low-profile integrated LED fixtures have changed the practical meaning of flush mount ceiling light installation. Traditional fixtures usually expose a socket, replaceable lamp, and shade. Modern designs may combine an LED module, driver, diffuser, and slim housing, which can simplify the visible profile while making access and replacement planning more important.
Many current fixtures use keyhole mounting slots, compact brackets, or specialized driver compartments. Some designs may also specify drywall anchors for particular trim components, but those anchors shouldn't be confused with structural support for the electrical box. The box and approved support carry the fixture unless the manufacturer's installation method states otherwise.
Installation is only part of the ownership decision
An integrated LED fixture should be evaluated by asking what happens after installation:
- Driver access: Can the driver be reached without damaging the ceiling or decorative trim?
- Module replacement: Does the design provide a serviceable LED component, or is the complete fixture treated as the replacement unit?
- Dimming: Is the existing dimmer compatible with the fixture's driver? Compatibility must be confirmed from the fixture documentation rather than assumed from the switch's appearance.
- Box depth: Does the housing require additional space behind the canopy, or does its shallow profile depend on a specific bracket position?
- Trim retention: Are the diffuser, shade, and decorative elements secured with clips, screws, or a threaded ring?
These questions matter for homeowners, property managers, and contractors who need a predictable maintenance plan. A fixture that installs quickly but requires removal of finished ceiling material for service may be the wrong choice for a hard-to-access hallway.
The Golden Lighting Ariella 3-light Flush Mount is a useful example of how a contemporary fixture can combine a glass shade with a clean metal frame, available in Brushed Champagne Brass or Matte Black. Its installation still depends on the supplied hardware, correct box alignment, and adequate conductor space — the same three checks that govern every flush mount in this guide, regardless of finish.
A traditional bulb-and-shade model can offer familiar lamp replacement, while an integrated LED model can offer a slimmer, more unified housing. Neither approach is automatically right for every room. The correct choice accounts for access, dimmer compatibility, replacement strategy, and the ceiling conditions already present.
Sizing and Clearance Rules for Specific Rooms
A low ceiling, narrow passage, or crowded closet can turn a visually attractive flush mount into a clearance problem. Evaluate the fixture's height, room scale, enclosure, and environmental rating together. A shallow hallway fitting usually preserves circulation, while a kitchen nook may support a more visible fixture with layered lighting. Golden Lighting's fixture sizing and placement guidance offers a useful starting point for proportion and placement.
In walking areas, Golden Lighting's own installation standard keeps at least 7 feet of clearance between the floor and the bottom of any hanging or surface fixture — the same head-clearance floor used throughout the industry for hallways, entries, and other circulation paths. In Canada, the Canadian Electrical Code sets a comparable benchmark for rigidly mounted luminaires: a minimum mounting height of 2.0 m above the floor, increasing to 2.1 m where the lamp is unguarded. Confirm the requirements that apply in your specific jurisdiction before installation.
Room-Specific Flush Mount Guidelines
| Room Type | Minimum Clearance / Rating | Design Recommendation |
|---|---|---|
| Hallway or entryway | At least 7 feet of floor-to-fixture clearance in the walking path (2.0–2.1 m in Canada, per the Canadian Electrical Code). | Choose a shallow, evenly diffused fixture that keeps the passage visually open. |
| Closet | Under NEC 410.16, a surface-mounted incandescent or LED luminaire with a completely enclosed light source needs 12 inches (305 mm) of clearance from the nearest storage point; a surface-mounted fluorescent luminaire needs 6 inches (152 mm). Open or partially enclosed lamps, and pendants, aren't permitted in a closet at all. | Keep the fixture clear of shelves and hanging garments. Use enclosed construction — it's required here, not optional. |
| Bathroom | The fixture must carry an environmental rating suitable for its location. | Use a damp-rated or otherwise appropriately listed fixture, and keep it outside restricted wet zones unless its rating permits that placement. |
| Kitchen nook | Clearance depends on the layout, ceiling height, and nearby work surfaces. | A transitional option such as the Colson 4-light Flush Mount in Olympic Gold can add presence where a low-profile fixture would disappear against the cabinetry. |
Integrated LED fixtures also require lifecycle planning. Confirm how the light source and driver are serviced before choosing a fitting for a difficult-to-reach room. A slim housing may suit a low ceiling, yet its long-term value depends on access to replacement parts or the complete fixture.
Finish coordination can connect a flush mount with chandeliers, pendants, or outdoor lighting. Repeat a finish, proportion, or material rather than forcing every fixture to match. That approach keeps the lighting plan intentional while allowing each room to meet its own clearance and maintenance needs.
When to Call a Licensed Electrician and Final Steps
A basic replacement with an existing, sound box may be manageable for a capable homeowner, but several conditions should end the DIY portion immediately. Missing junction boxes, aluminum wiring, damaged insulation, uncertain circuit identification, a new circuit, or a fixture that needs new structural support all call for a licensed electrician.
Under NEC 314.27, a ceiling outlet box intended to support a luminaire is generally expected to support at least 50 pounds unless listed and marked for a greater weight, while a box used as the sole support for a ceiling-suspended fan must be separately listed and marked by the manufacturer for that purpose. That distinction matters when a homeowner considers a large fixture, fan, or substantial decorative assembly — a box rated for a light fixture is not automatically rated to carry a fan.
The right time to hire an electrician is before an uncertain condition becomes hidden behind a finished canopy.
Before final tightening, verify that the bracket is level, the box is stable, the canopy meets the ceiling evenly, the conductors are fully contained, and the fixture's trim is secure. Restore power only after the mechanical installation is complete, then test the switch and dimmer while watching for flicker, unusual noise, heat, or movement.
Golden Lighting can be considered alongside other fixture options when the project calls for coordinated residential lighting across flush mounts, pendants, chandeliers, baths, or outdoor areas. Choose the fixture only after the box, support, clearance, wiring, and lifecycle requirements have been verified.
Review Golden Lighting's Flush and Semi-Flush collection, compare finishes and profiles for the room, and contact a qualified electrician when the box, wiring, or structural support isn't clearly suitable. A careful installation delivers more than a brighter ceiling. It provides a durable lighting decision that remains safe, serviceable, and visually balanced.
— seen a lot of light fixtures in 80+ countries. Still learning what actually works in a home.












Share:
Kitchen Lighting for Low Ceilings Guide
Large Entryway Lighting That Actually Fits