



A dining room can have beautiful furniture and still feel uncomfortable at dinner. Faces disappear into shadow, polished surfaces glare, and food loses its natural color when one undersized chandelier struggles to cover the table. A mismatched pair of pendants creates a different problem, the light may be adequate, but the room feels visually unsettled.
Written by Rick Kovac, COO of Golden Lighting
The takeaway: Dining room ceiling lighting works when fixture scale, hanging height, light quality, and controls are chosen from the table outward, not picked as a standalone decoration.
Key takeaways:
- Size the fixture to the table, not the room: roughly half to two-thirds of the table's length, hung 30 to 36 inches above the tabletop.
- Warm 2700–3000K light with strong color rendering keeps faces, food, and finishes looking natural; a dimmer turns one fixture into several rooms in one.
- A single ceiling fixture works for a compact table and modest room; long tables, open-plan layouts, and dark walls call for layered lighting instead.
- Match the finish to what's already in the room, then confirm scale, dimmer compatibility, and the fixture's rated use before ordering.
The right dining room ceiling lighting solves both issues. It puts useful illumination on the tabletop, keeps sightlines open, supports the room's style, and gives the space enough flexibility for dinner, homework, conversation, or cleanup. Golden Lighting approaches the decision from the top down, combining fixture scale, light quality, glare control, and finish coordination rather than treating a ceiling fixture as decoration alone.
Introduction to Dining Room Ceiling Lighting
A dining table may host a formal evening meal, a quick breakfast, paperwork, or games. One fixed light level cannot serve those activities equally well. Set the lighting plan around the table's changing use, then choose the fixture and controls.
Dining-room ceiling lighting developed alongside that need for practical flexibility. Homes moved from candles and lamps to gas, then electricity, over the course of the 19th century, and by its final decades an electrically lit dining room had become a marker of a modern, up-to-date home in major markets. The change linked ceiling-centered illumination with modernity and status well before it became the default it is today.
Ceiling fixtures still form a major part of residential lighting. The ceiling segment represented 36.68% of the U.S. residential lighting fixtures market in 2022, according to Grand View Research's U.S. residential lighting fixtures market analysis.
The problems a ceiling fixture must solve
A sound plan answers four questions:
- Coverage: Does light reach the entire tabletop, including the ends of a long table?
- Comfort: Can diners see one another without exposed lamps shining into their eyes?
- Color: Do skin tones, wood finishes, ceramics, and food appear natural?
- Control: Can the room shift from relaxed dining to brighter cleaning or work?
Use a single ceiling fixture when the table is compact, the room has limited headroom, and the fixture can distribute light evenly across the surface. Choose layered lighting when the table is long, the room is open-plan, or ceiling light alone leaves walls and circulation areas dim. This decision prevents an oversized fixture from doing every job poorly.
Start with the table rather than the ceiling box. Fixture shape, suspension height, output, shade material, and dimming must work together. A sculptural chandelier can anchor a formal room, while a low-profile fixture preserves headroom in a compact apartment. In an open-plan home, combine sources deliberately so the dining area feels defined without becoming visually disconnected from the kitchen or living room.
Pro-Tip: Tape the fixture's approximate outline to the ceiling, or suspend a temporary cardboard template above the table. The test exposes scale and sightline problems faster than a product photograph.
Understanding Dining Room Ceiling Lighting Types
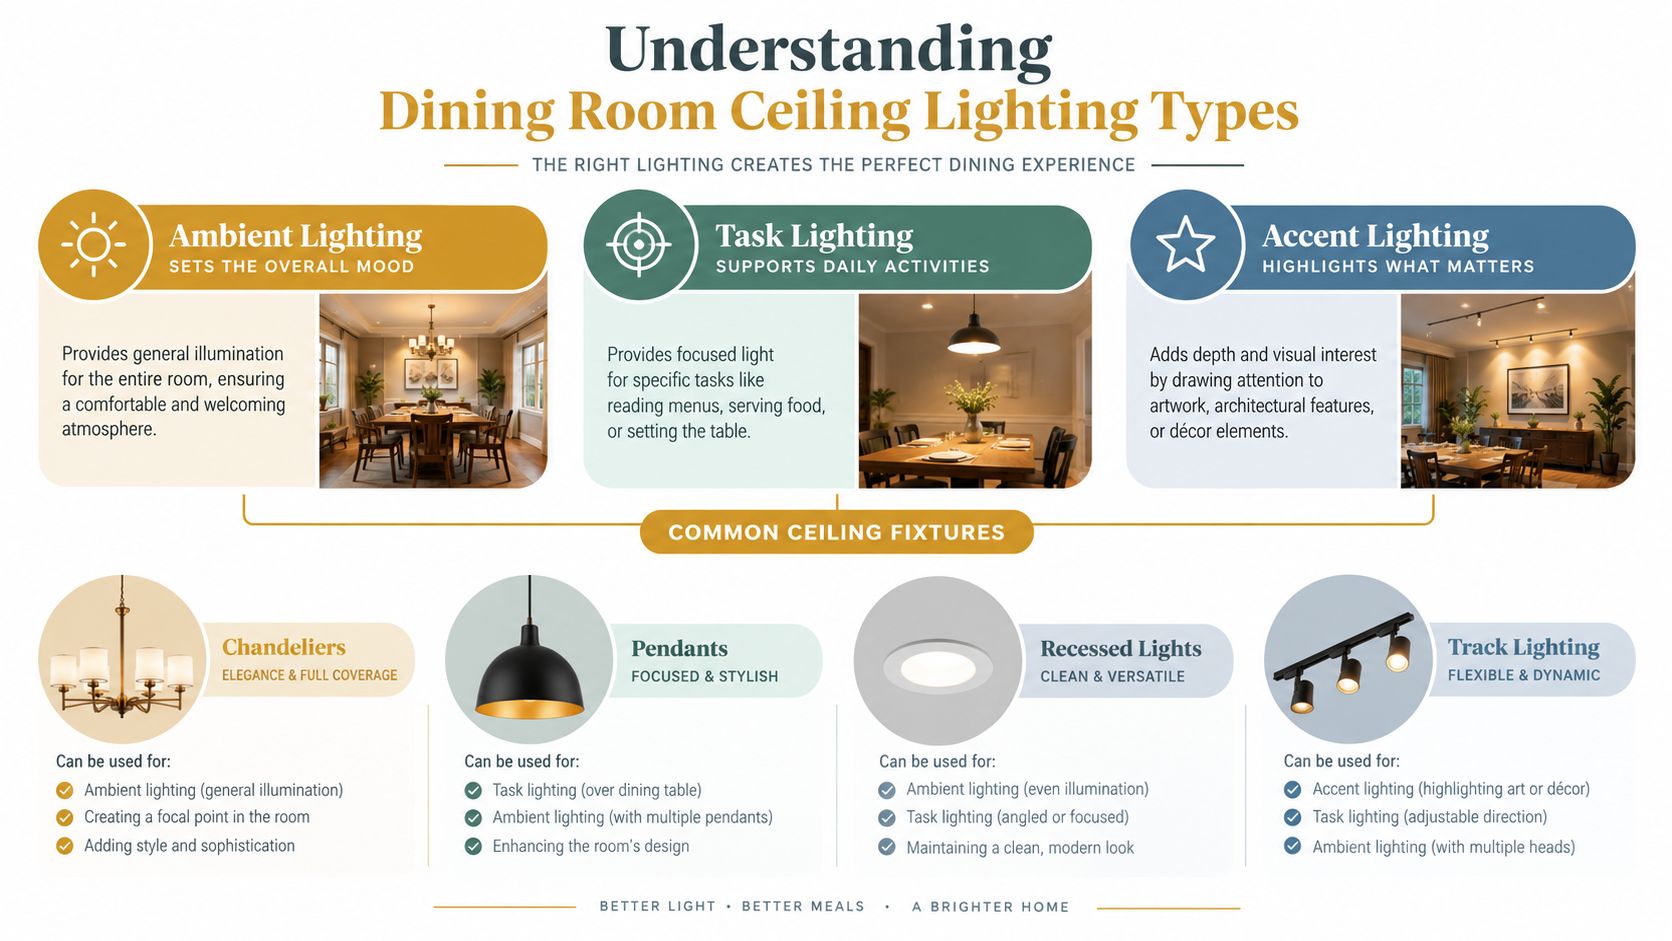
A dining room feels balanced when each fixture has a clear assignment. Ambient lighting establishes general visibility, task lighting concentrates illumination over the table, and accent lighting directs attention to artwork, millwork, or architectural details. One ceiling fixture can cover multiple roles, but separating those roles makes brightness, glare, and atmosphere easier to control.
Match the fixture to the room's job
Start with the table, not the ceiling box. A single fixture is the right choice for a compact table, limited headroom, and a shade or diffuser that spreads light evenly from end to end. Use layered lighting for a long table, an open-plan room, or any layout where ceiling light leaves walls and circulation paths dim. This rule prevents one oversized fixture from trying to provide coverage, comfort, and visual emphasis at once.
Chandeliers provide the clearest visual center for a formal dining room. A traditional multi-arm design suits a classic interior, while an open-frame sculptural form adds presence without blocking views across the table. Check the downward light as well as the silhouette. The fixture must look intentional when switched off and remain comfortable for seated diners when it is on.
Linear pendants distribute light along a rectangular table and prevent the ends from falling into shadow. Their length also reinforces the table's geometry and helps define a dining zone within an open-plan layout.
Single pendants suit round tables, breakfast nooks, and smaller dining areas. Their compact footprint is easy to scale, while an opaque or frosted shade can soften light entering guests' sightlines.
Flush and semi-flush mounts serve rooms with shorter ceilings. A semi-flush design preserves more visual height than a suspended chandelier while still adding shape and finish. Choose a flush mount when a low profile is required, and select a diffuser that spreads light broadly instead of producing a concentrated bright spot.
Recessed lights and track lighting support general or directional illumination but rarely provide enough visual focus alone. Place recessed fixtures around the perimeter or at an open-plan transition. Aim track heads toward artwork, a buffet, or a sideboard, away from diners' direct sightlines.
Choose the level of customization
A mix-and-match system such as YEP by Golden lets homeowners coordinate shades, finishes, and glass instead of accepting one fixed combination. A showroom-forward Ziva piece suits a formal interior where the fixture must carry architectural weight. Choose based on room scale, budget, and the level of personalization required.
Pro-Tip: Order a finish sample before committing to a YEP mix-and-match build. Metal finishes and glass tones can shift noticeably under a screen's white balance versus your own dining room's light.
How to Size and Position Fixtures
A fixture that's too small looks lost above the table and concentrates light in the middle. A fixture that's too large crowds sightlines, competes with the furniture, and can make the dining zone feel physically compressed.
Start with the table
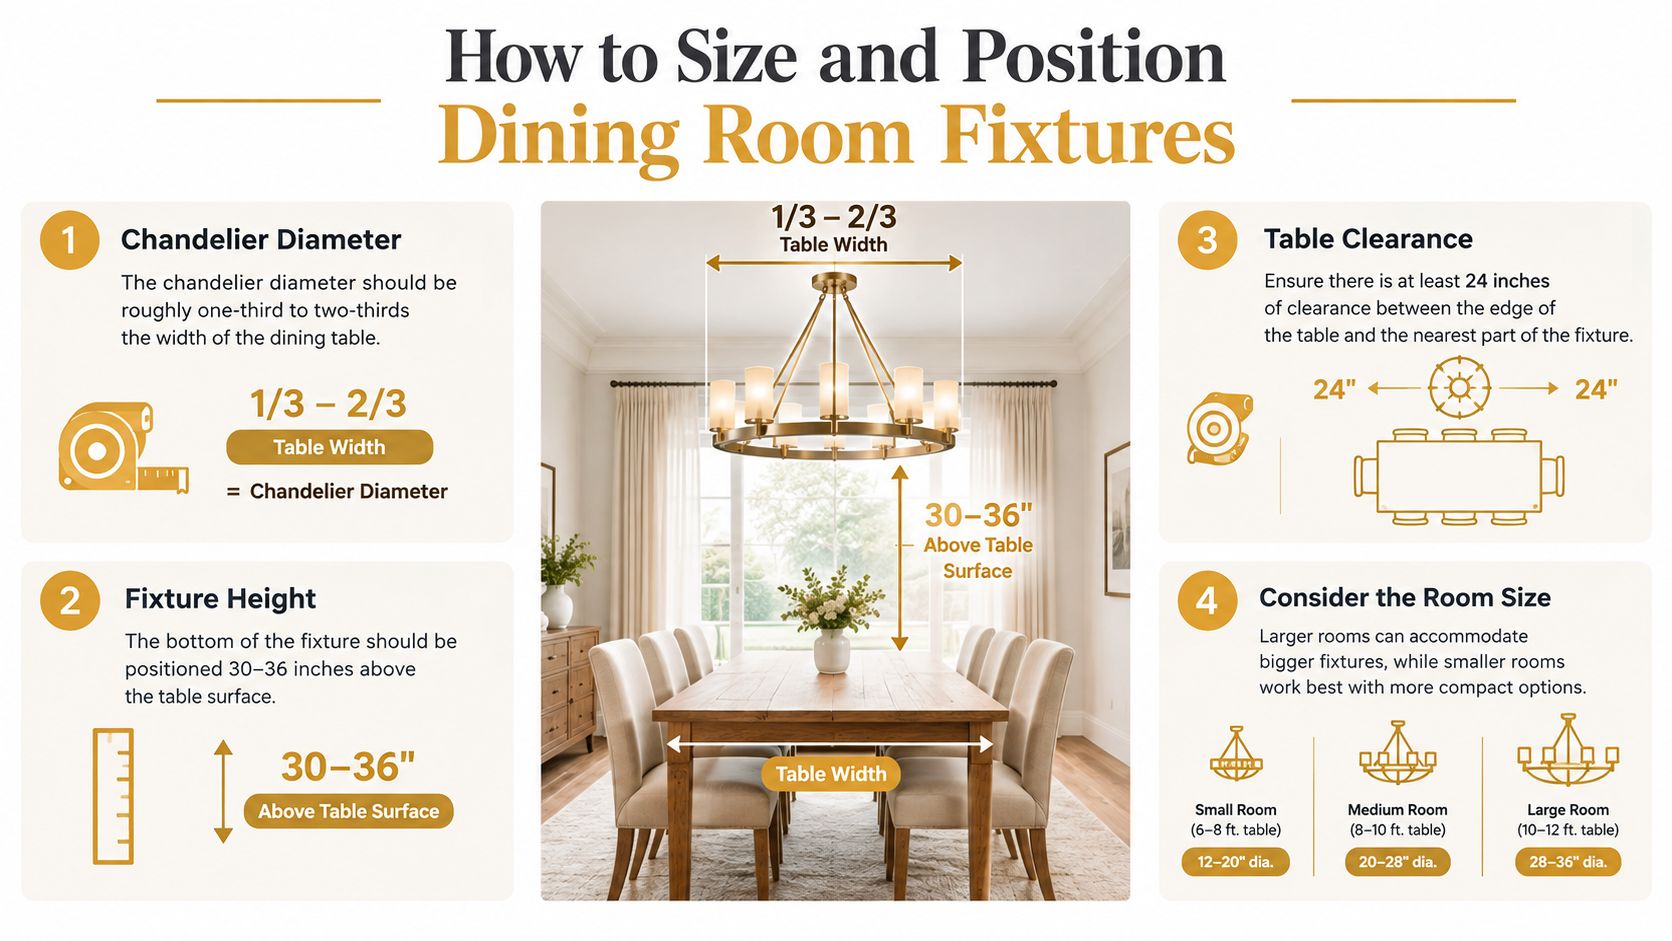
For a linear suspension, Golden Lighting's own Golden Scale Method puts the useful proportion at roughly half to two-thirds of the table's length. Keep the fixture narrower than the table on every side, with a modest buffer at each edge rather than crowding the perimeter, so the table keeps its own visual frame. These two checks work together: the first sets visual proportion, the second protects clearance at the edges.
Use the table shape to select the silhouette:
- Round table: A round or compact globe pendant keeps the composition centered and calm.
- Rectangular table: A linear chandelier or elongated pendant spreads light across the full length.
- Square table: A centered square, round, or compact sculptural fixture can echo the table without extending beyond its visual footprint.
- Long open-plan table: A linear fixture defines the dining zone more clearly than several unrelated ceiling spots.
The fixture should be centered over the table, not automatically over the room. If the table sits off-center because of a walkway, cabinet run, or adjacent seating area, the light follows the furniture.
Set the hanging height
Golden Lighting's standard is to hang the bottom of the fixture 30 to 36 inches above the tabletop, with adjustments for ceiling height and fixture scale.
That range protects seated sightlines while keeping the fixture visually connected to the table. A broad opaque shade may need more openness around its lower edge, while a slender open frame can sit comfortably within the same starting range. Taller ceilings may require additional suspension length so the fixture doesn't appear stranded near the ceiling, but the final judgment remains the seated eye line and the table's proportions.
For detailed guidance on scale, alignment, and placement, use Golden Lighting's guide to sizing and placing a light fixture.
Build an even linear array
Multiple pendants should read as one composition. Their spacing needs to feel balanced between the table ends and the gaps between fixtures. In an open-plan room, align the fixture with the table's centerline and use its length to visually separate dining from living without creating a hard boundary. For more on choosing and spacing pendants specifically, see Golden Lighting's guide to pendant lights over a dining room table.
A temporary mock-up remains the most dependable final test. Hang paper or cardboard forms at the intended height, sit in every chair, and check whether the fixture blocks faces or creates a bright source in the direct line of sight.
Choosing Light Output and Controls
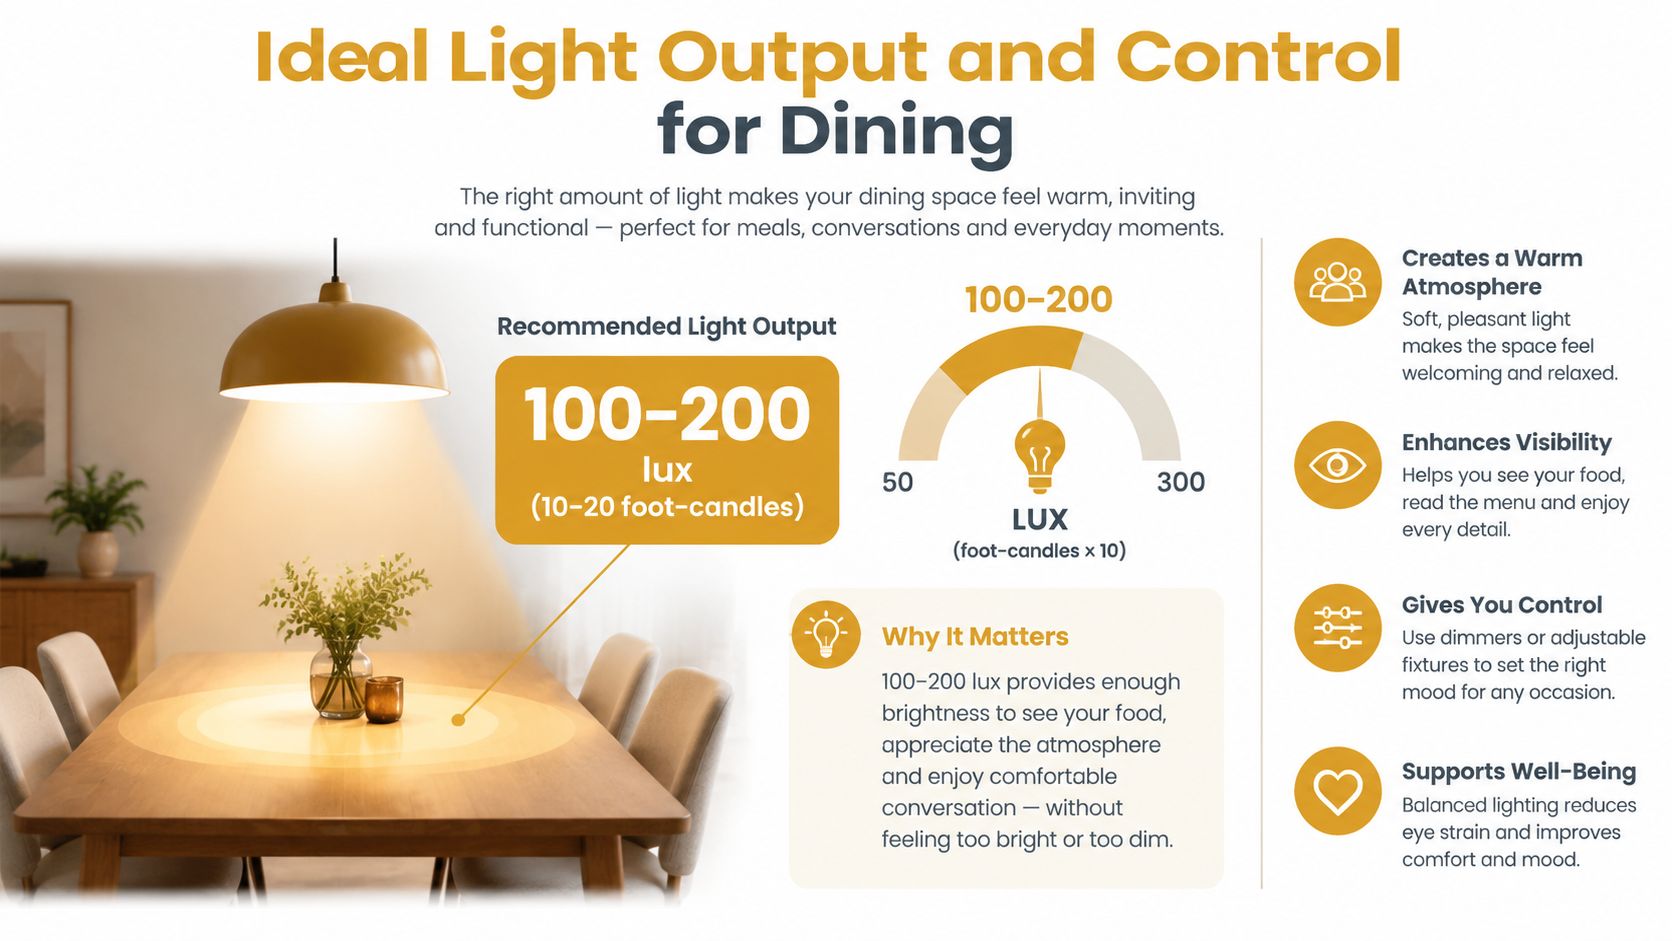
A welcoming dining room isn't only a bright dining room. The useful target is illumination on the table surface, where plates, hands, cards, and written work are placed.
ANSI/IES RP-11-26 sets maintained tabletop illuminance for dining at roughly 5 footcandles for formal dining, 10 footcandles for everyday/informal meals, and 20 footcandles when the table doubles as a workspace for homework or paperwork. This band supports relaxed atmosphere while keeping faces and table settings readable. Raising ambient light beyond it can flatten the mood and increase perceived glare, while dropping below it can make food presentation and visual comfort worse.
Specify light quality, not just brightness
Lumens describe the amount of visible light produced by a source. Watts describe electrical power, so wattage alone doesn't tell a homeowner whether a fixture will illuminate the tabletop evenly. The fixture's optics, shade opacity, mounting height, and distribution determine how much of that output reaches the eating surface.
Golden Lighting's standard for fixtures over a dining table is 2700 to 3000 K color temperature and a color-rendering index that exceeds the 80-CRI industry minimum, in the band reserved for color-critical spaces — every Golden LED is built to this standard. Glare matters as much as color: a widely used discomfort-glare benchmark, UGR ≤19, is a useful practical target for fixtures aimed toward seated guests, achieved through shade opacity and diffusion rather than a bare, direct-view lamp. Warm light generally supports flattering skin tones and appetizing food color, while high CRI preserves the distinction between finishes, ingredients, and textiles.
Illumination changes how a paint, wood, or upholstery sample reads after dark — the same swatch that looked right under afternoon daylight can shift under a warm 2700K dining fixture, which is one more reason to judge finish and color choices under the room's actual evening light rather than in a showroom or on a screen.
Make control part of the specification
A dimmer is not an accessory. It gives one fixture several operating modes:
- Everyday dining: Moderate output for comfortable meals and conversation.
- Task mode: Higher output for homework, games, or paperwork.
- Cleaning mode: Brighter illumination for wiping the table and checking the floor.
- Evening mode: Lower output that keeps the room intimate without switching the fixture off.
The dimmer, bulbs, and LED driver must be compatible. Golden Lighting's guide to choosing light bulbs can help narrow the selection before installation.
Video: a walkthrough of sizing and hanging a dining room fixture over the table.
Layering Ceiling Lighting with Other Sources
The table is set, guests are seated, and the chandelier is dimmed for conversation. If the walls and buffet disappear into shadow, the ceiling fixture is carrying too much responsibility. A single fixture works when the dining room is compact, the table is modest, and the room serves meals without separate display or seating functions. Choose layered lighting when the table is long, the walls are dark, artwork needs emphasis, or a nearby sideboard requires its own illumination.
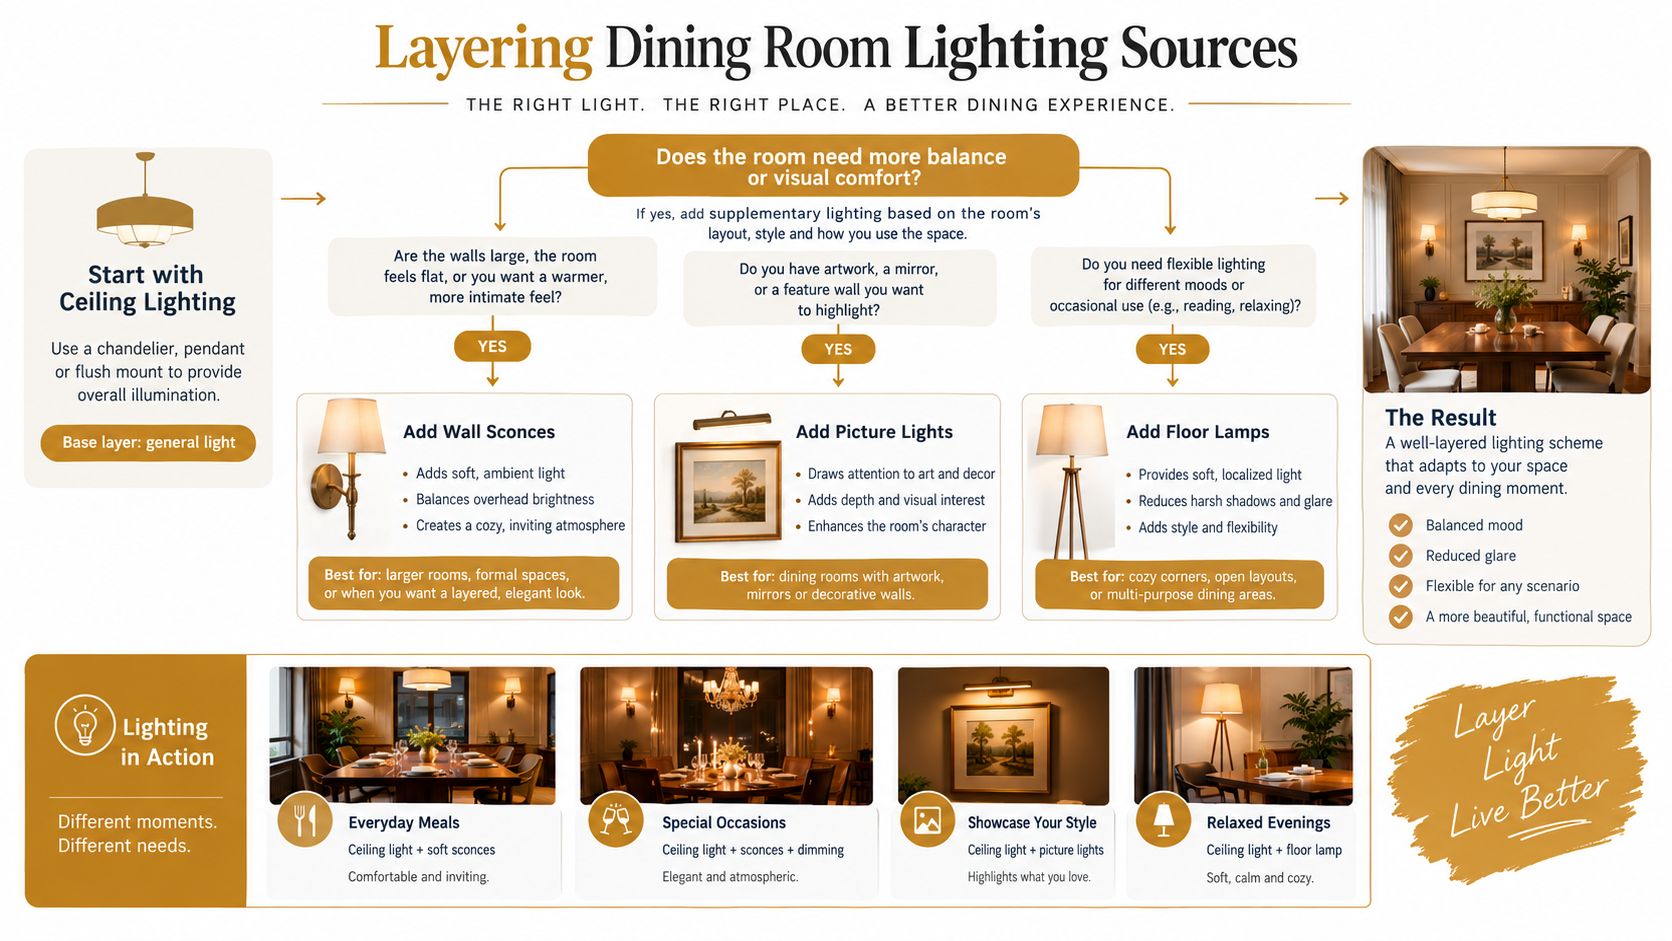
Current design guidance favors combinations of pendants, sconces, floor lamps, picture lights, and discreet linear LEDs over a recessed-only plan. Warm, dimmable sources and tunable-white options support different dining conditions. Use that direction as a starting point, then apply a practical rule: rely on one fixture if it lights the table evenly and the surrounding walls remain comfortable at the selected dimmed level. Add a layer when lowering the fixture leaves the room visually empty.
Use the ceiling fixture as the anchor
The overhead fixture should establish the dining area's main visual and functional focus. A chandelier or linear pendant provides the primary light on the table. Secondary sources keep the walls and furniture from falling into darkness, so the central fixture does not need excessive output.
Add wall lighting if the room feels cave-like after the ceiling fixture is dimmed. Sconces on a side wall can raise background brightness and make the table feel connected to its surroundings. Select diffused shades or concealed sources when diners can see the fixtures from their seats.
Match each added source to a missing function
- Buffet or sideboard: Add a sconce, picture light, or discreet directional fixture when servingware and display pieces need dedicated illumination.
- Artwork or architectural detail: Use a picture light or adjustable accent source so the wall contributes to the evening composition.
- Open-plan transition: Choose linear LEDs or coordinated ambient sources to connect the dining area with the living room without introducing another dominant pendant.
- Flexible seating zone: Place a floor lamp near a reading chair or occasional seat when the dining area extends beyond the table.
Mixed shades and finishes can work when one design idea controls the composition. Golden Lighting's YEP customizable approach can coordinate shade profiles while allowing deliberate variation in finish or glass. Fixtures should appear related, not identical.
Control each layer independently
Give the ceiling fixture, wall lighting, and accent lighting separate controls when the wiring allows it. Lowering the table light while keeping artwork or wall illumination active preserves atmosphere without over-brightening the center.
Golden Lighting's guide to layering lighting helps assign each source a role before fixtures are purchased. Specification should follow the room's functions, not a fixed number of fixtures.
Coordinating Style Finishes and Energy Tips
Finish selection should connect the fixture to the room's existing materials, but coordination doesn't mean matching every metal. A dining room with warm wood, aged hardware, and natural textiles can support brass or bronze. A room built around crisp cabinetry and dark window frames may benefit from matte black. The fixture should relate to the table, chairs, flooring, and nearby kitchen hardware without disappearing into them.
Select the finish by visual weight
Brass creates warmth and draws attention, making it effective for traditional chandeliers and modern sculptural pendants. Matte black creates graphic definition and suits clean-lined furniture, especially when the room needs a strong outline against a pale ceiling. Bronze offers depth and a more grounded presence, particularly in rooms with wood, leather, or earth-toned finishes.
Shade material changes the result as much as the metal:
- Opaque metal shades direct light downward and create a focused table presence.
- Fabric shades soften the source and reduce the visual sharpness of the fixture.
- Frosted glass spreads light more gently than clear glass.
- Clear glass preserves an airy silhouette but demands careful glare control and lamp selection.
Golden Lighting's Cassio 1-light Pendant in Matte Black illustrates how a dark finish can create a clean linear accent, while the Bartlett 3-light Outdoor Ceiling in Textured Bronze demonstrates how a rugged bronze treatment can introduce industrial character. The Bartlett is rated for outdoor use — any indoor reuse should follow the product's listed application and installation requirements rather than the reverse. Golden Lighting offers these and other options across its Chandeliers collection and Pendant Lighting collection.
Reduce operating waste without flattening the design
LED sources are the practical starting point for efficient operation, especially when the fixture supports dimming and the driver is compatible with the intended control. ENERGY STAR certified fixtures can help buyers identify products that meet the program's efficiency requirements, while local rebates may reduce purchase costs where available.
Smart controls add value when the dining room serves several purposes. A scheduled or preset scene can lower output for evening meals and raise it for cleaning, so the fixture doesn't run at its brightest setting for every use. The energy decision should always preserve light quality, dimming stability, and replacement access. A fixture that saves energy but produces glare or poor color remains a poor dining-room specification.
Installation Safety and Maintenance Guidelines
Hardwired ceiling fixtures require more than a visual inspection. The electrical box, circuit, grounding path, mounting hardware, and fixture weight must all work together. A qualified electrician should handle work that exceeds the homeowner's training, particularly in older homes or where the existing box and wiring are uncertain.
Complete the installation checks
- Turn off power at the service panel. A wall switch alone isn't a sufficient safety confirmation. Test the circuit with an appropriate voltage tester before touching conductors.
- Verify the junction box. The box must be properly secured and rated for the fixture's weight and mounting method. A decorative canopy can hide a weak or poorly supported box.
- Check the circuit and connections. Confirm that the circuit is suitable for the fixture and that wire connections are enclosed with approved connectors.
- Ground the fixture correctly. Follow the manufacturer's wiring instructions and connect the grounding conductor as specified.
- Use listed products. Look for the applicable safety listing on the fixture and follow the installation instructions rather than improvising hardware.
- Match the mounting hardware to the ceiling. Drywall, plaster, and exposed beams each require appropriate support. Anchors intended for one surface shouldn't be substituted for another.
The canopy should sit securely against the ceiling, and the fixture should hang level over the table. If the ceiling is sloped, the installer may need a compatible swivel or angled mounting solution.
Keep the light performing
Dust and residue reduce output and make shades look uneven. Turn off power, allow lamps to cool, and clean glass or metal with the method recommended by the manufacturer. Avoid spraying cleaner directly into sockets, drivers, or electrical housings.
Inspect the fixture periodically for loose decorative parts, damaged cords, flickering, discoloration, or dimmer behavior. Replace cracked diffusers and lamps promptly. LED modules may require service rather than a simple bulb change, so the homeowner should keep installation records and product information.
Safety check: If a fixture flickers after a dimmer change, smells hot, shows scorch marks, or moves at the junction box, stop using it and have a qualified electrician inspect the installation.
Trends and Integrating Golden Lighting Collections
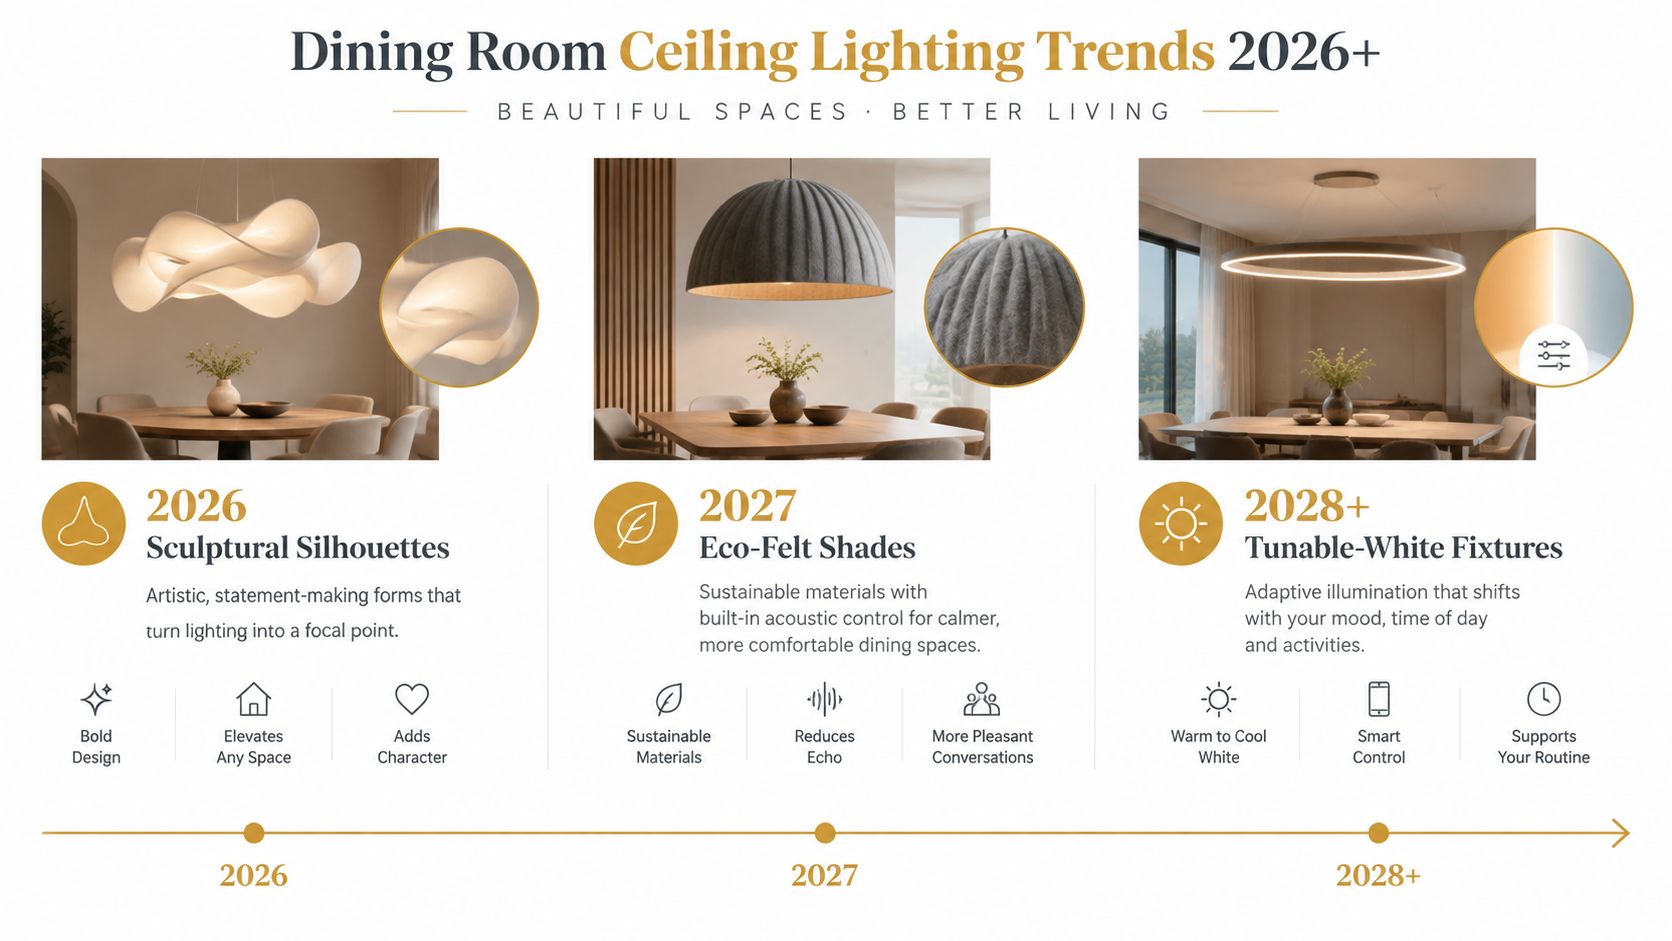
Dining-room ceiling lighting now serves two jobs: it defines the table and supports comfortable work, conversation, and entertaining. Current direction favors sculptural forms, warm dimmable light, tunable-white systems, discreet linear LEDs, and coordinated pendants with sconces. Eco-felt shades can soften glare while reducing reflected noise in open-plan rooms with hard surfaces.
Match the fixture to the room
Use one substantial fixture when the table has a clear focal point, the ceiling height supports it, and the fixture can distribute light evenly across the tabletop. A long table with low visual contrast benefits from a sculptural linear fixture with diffused output. Its length reduces isolated bright spots and gives the dining area a stronger center.
Choose layered lighting when the dining room shares space with a kitchen or living area, or when the table needs different settings for meals, homework, and entertaining. A restrained ceiling fixture over the table, paired with discreet linear LEDs near the living-area transition, establishes the dining zone without adding a second oversized statement piece. For a style-specific take on this decision, see Golden Lighting's guide to choosing a mid century modern dining room light.
Style should follow the interior specification. A custom project with substantial millwork can accommodate a high-end Ziva by Golden piece, selected for proportion, materials, and finish coordination. For a more adaptable creative scheme, YEP by Golden allows shade and finish combinations while keeping the room's forms related.
Set a useful control standard
Tunable-white fixtures suit rooms that change use throughout the day, but the control system must earn its place. Confirm that the homeowner will use the feature, the dimming is smooth, and the light remains comfortable across the full table. A fixture with fewer controls but better glare management and color quality is the stronger choice.
The move from candles and lamps to electric ceiling fixtures once signaled a modern dining room, the same way a well-specified fixture signals a considered one today: the standard changes, but the underlying test doesn't.
The lasting standard is practical: visual character, accurate color, controlled glare, adjustable output, and proportion suited to the table. Apply those tests to sculptural, vintage-inspired, and modern designs before accepting trend language as a substitute for performance.
Choose the dining table first. Then select the fixture shape, scale, light quality, and controls that match the room's use. Explore Golden Lighting's Chandeliers, Pendants, and complementary collections, then confirm scale, dimmer compatibility, and installation requirements with a qualified lighting professional or showroom before ordering.
— seen a lot of light fixtures in 80+ countries. Still learning what actually works in a home.












Share:
What Is Semi Flush Mount Lighting and Where to Use It
Outdoor Chandelier for Gazebo: A Complete Buyer's Guide