



Written by Rick Kovac, COO of Golden Lighting
The takeaway: Contemporary pathway lighting works by pairing measured spacing and warm, shielded light with the route's real geometry, not by maximizing brightness or lining a walk with evenly spaced fixtures like a runway.
Key takeaways:
- Plan spacing around beam spread and uniformity, not a fixed rule — tighten the rhythm only at steps, curves, and transitions, and stagger fixtures rather than lining both edges.
- Stay in the warm 2700K-3000K band with consistent, shielded output; every Golden Lighting LED already exceeds the 80-CRI industry minimum, so materials along the path keep their true color.
- Match the fixture family (bollard, in-ground, or linear) to the architecture and the route's real visibility needs, not to trend alone.
- Plan the transformer location, voltage, and cable routing before digging — voltage drop and difficult terrain are the two most common reasons a DIY layout underperforms.
A front walk can look finished in daylight and still feel wrong after sunset. Guests slow down at the steps, dark gaps hide the edge of the planting bed, and a bright porch fixture leaves the path itself in shadow. The answer isn't more brightness everywhere. It's a measured rhythm of low, warm light that helps people read the route while preserving the clean lines of a contemporary home.
Contemporary pathway lighting works when direction, spacing, glare control, and fixture design support one another. The result should feel intentional rather than theatrical, with light guiding movement from the curb to the entry and reinforcing architecture along the way. The following approach gives homeowners practical rules for planning that balance, with enough flexibility for a straight suburban walk, a winding garden route, or a modern outdoor space with steps and changes in elevation.
Why Your Walkway Feels Dark and How Light Fixes It
A visitor reaches the front steps, slows at a shadowed curve, and looks down to find the path edge. The fixtures may be working, yet the route still feels uncertain. Usually, contrast causes the problem. A bright porch beside a dim walk creates constant adjustment, while isolated pools of light leave uncomfortable gaps between them.
A contemporary plan treats the walkway as one connected route. Low fixtures should reveal the walking surface, planting edges, transitions, and grade changes without competing with the entry. Shielded optics direct light downward and keep glare out of the viewer's line of sight. The goal is measurable guidance, not maximum brightness. Use enough illuminance to read the surface, maintain reasonably even coverage between fixtures, and choose spacing that matches the beam spread.
Start with movement and visibility
Ask where a visitor needs visual information. The entry point, a curve, a step, a surface change, and the place where the path crosses a driveway deserve more attention than an uninterrupted straight run.
These locations do not require glaring fixtures. They require continuity. Keep adjacent pools of light overlapping enough to avoid dark breaks, and check the uniformity from a normal walking position rather than judging each fixture in isolation. Golden Lighting's own design guidance treats path lights as a last resort rather than a default: use as few fixtures as the route genuinely needs, keep every one fully shielded and staggered on alternating sides rather than lined up in a formal row, and set them back among plantings so the walking surface reads as lit by ambient glow rather than by a row of visible lamps.
The outdoor pathway lighting market was estimated at USD 610 million in 2020 and USD 810 million in 2025, according to Ken Research's outdoor pathway lighting market overview. For homeowners, that growth is showing up in broader retail availability and more choices in compact, shielded fixtures. More choice helps, but beam control and placement still determine whether a product performs well on your property.
Professional insight: A modern path should make the route obvious, not advertise every fixture.
Avoid the runway effect by varying fixture distance from the edge and allowing planting to soften the sightline. On straight sections, consistent spacing can support even coverage. Around curves and steps, aim the overlap toward the direction of travel and tighten the rhythm only where the route demands it. A well-planned uniformity ratio keeps bright spots from dominating the surface, while controlled glare preserves the clean lines of a contemporary home.
How to Map Your Path and Get Spacing Right
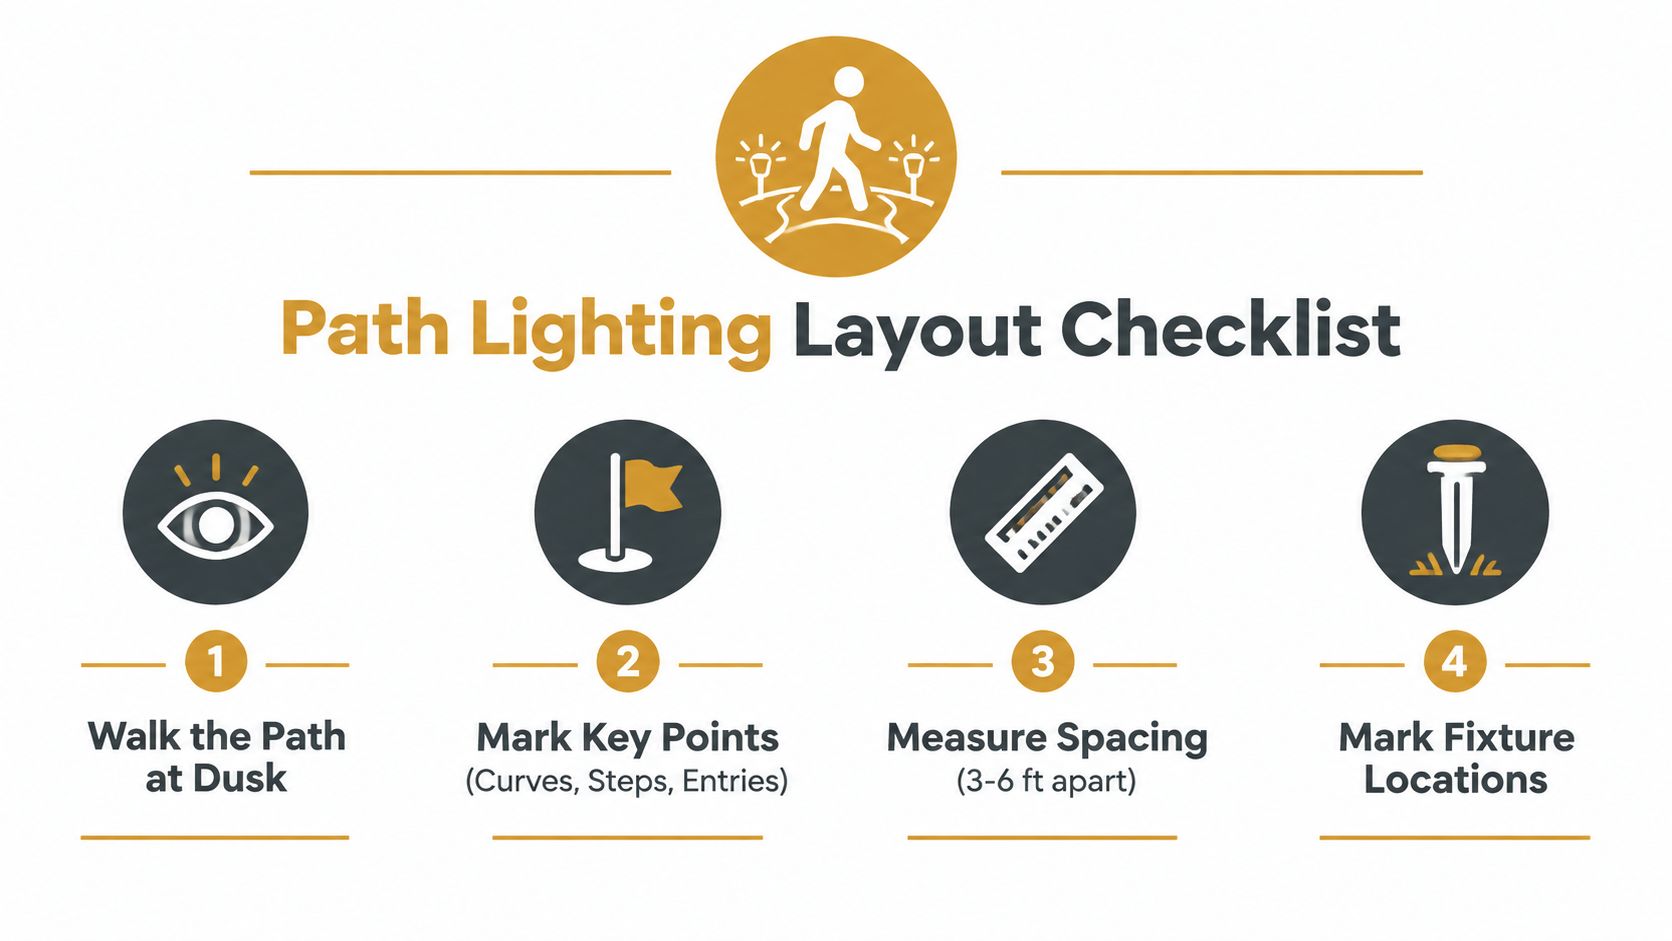
A reliable layout starts after daylight fades. Walking the route at dusk reveals what a plan drawing often misses, including reflected glare from paving, deep shadows beneath shrubs, and places where the path disappears against the surrounding ground.
Mark the decisions before the fixtures
Begin at the street or driveway and walk toward the entry several times. Mark these points with temporary flags or removable tape:
- Curves and turns: These need enough overlapping light to reveal the direction of travel.
- Steps and grade changes: Visibility matters more where feet change level.
- Entries and transitions: The handoff between driveway, walkway, porch, and garden should feel continuous.
- Obstructions: Note retaining walls, large plants, exposed roots, and surfaces that could block a beam.
For most residential pathway lighting, professional guidance commonly recommends 6 to 8 feet between fixtures, with tighter placement around 4 to 5 feet at steps, curves, and other safety-critical areas. Straight, even sections can usually tolerate wider spacing, while a winding path benefits from closer visual cues.
Beam spread matters as much as the tape measure. A broad beam can cover more walking surface, but it still needs enough overlap to prevent dark gaps on uneven ground. As a general rule, path-light spacing in the 6 to 10 foot range pairs well with beam spreads from 60 to 180 degrees — a narrower beam needs the tighter end of that spacing, while a wider beam can stretch toward the far end.
Let uniformity control the final pattern
Counting fixtures isn't a design method. The right question is whether the darkest portions remain comfortable to traverse. A cited pedestrian safety standard uses a 1:4 uniformity ratio, meaning the darkest point should be no less than one-quarter of the average brightness. Higher-traffic routes may favor 1:3 or 1:2, according to K-Led's pedestrian lighting guidance.
Use those ratios as a way to evaluate the pattern, not as permission to increase output. If bright spots are much stronger than the surrounding path, move fixtures, widen the beam, or add overlap before choosing a brighter lamp. Staggering fixtures on opposite sides usually looks more relaxed than lining both edges directly across from one another.
Pro-Tip: Set temporary fixtures at the proposed locations and view the path from the street, the front door, and the top of every step. If the eye notices the fixture before the route, adjust the shield, angle, or position before digging.
For a deeper planning reference, Golden Lighting's landscape lighting ideas guide can help connect path illumination with planting beds, entries, and exterior architecture. The final test is simple: the path should read as one connected journey, not as separate circles of light.
Choosing Contemporary Fixtures That Match Your Modern Home
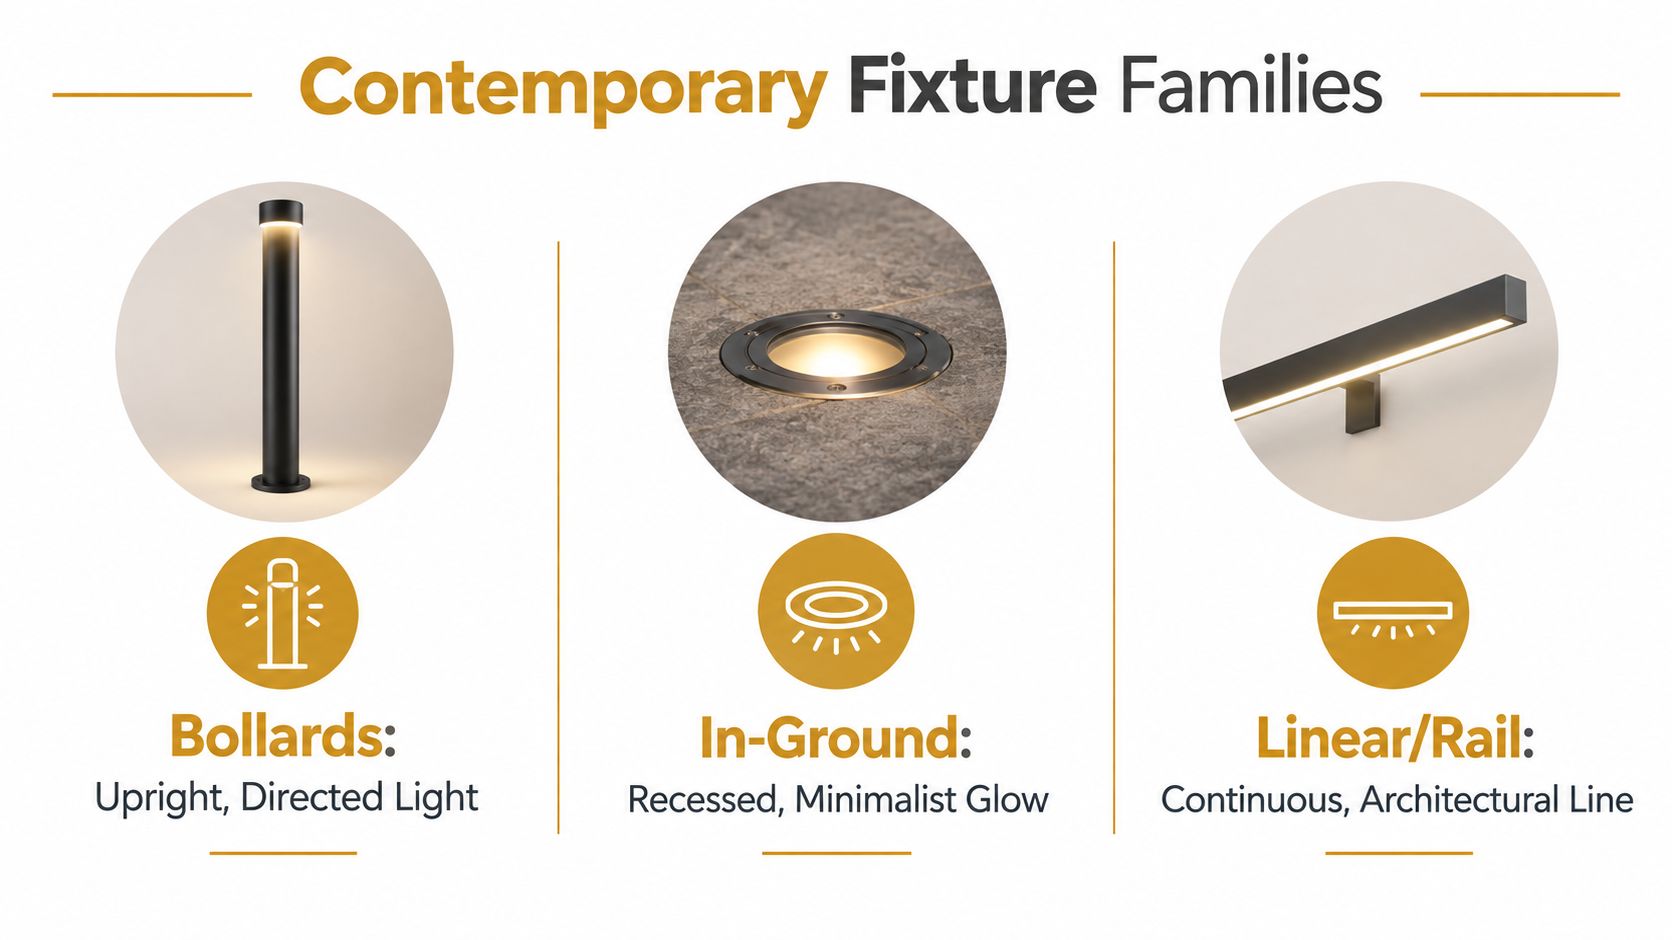
Fixture selection should follow the architecture and the path's performance needs. A slim black bollard may echo strong vertical window mullions, while an in-ground fitting can preserve a nearly uninterrupted plane of concrete, stone, or gravel. Neither is automatically more contemporary. The right choice depends on whether the route needs visible direction, concealed light, or a continuous architectural line.
Compare the main fixture families
| Fixture family | What it contributes | Where it can fall short |
|---|---|---|
| Slim bollards | Upright form, directed downward light, and clear visual markers along open paths | Can become visually prominent if the spacing or height feels too formal |
| In-ground fixtures | Recessed, minimalist illumination that keeps sightlines clean | Poor aiming or exposed glare can make the source uncomfortable to view |
| Low-profile spread lights | A softer pool across planting edges and residential walks | Excessive output can create scalloping and bright spots |
| Linear or rail systems | A continuous architectural line along walls, steps, or hardscape | More complex installation and greater sensitivity to drainage and weather |
A modern fixture should disappear into its surroundings without disappearing from the design logic. Slim bollards suit an exposed route where visitors need to recognize the path from a distance. In-ground lights work better where the architecture depends on uninterrupted geometry, but they must be carefully shielded so people don't look directly into the source.
Materials deserve equal attention. Look for corrosion-resistant aluminum housings, stainless fasteners, and weather protection rated IP65 or better when the fixture is exposed to rain, irrigation, soil, or coastal air. Higher-end linear in-ground applications may use 24 V or 48 V systems, while compact path lights commonly operate in 9 to 15 V ranges, including 12 V systems. Product-level examples include 270 lumens at 2 watts with a 120-degree beam spread, as shown in this contemporary low-voltage path-light specification.
Match finish and scale without overmatching
A dark finish can recede against mulch and foliage. A warm metallic finish can connect the path to brass hardware, a wood door, or warm masonry. The fixture doesn't need to match every exterior element, but it should repeat a deliberate material or silhouette.
Creative homeowners can use YEP by Golden's mix-and-match approach to personalize shades, finishes, and glass across compatible lighting pieces. For a more showroom-oriented specification, Ziva by Golden offers pieces suited to refined residential and hospitality settings. Golden Lighting's LED post light guide provides related direction for outdoor post-light decisions.
A dark-sky-friendly contemporary scheme favors downward control, lower output, and restrained fixture visibility. Bright, evenly spaced objects may look impressive in a product photo, but they can flatten the surroundings and send attention away from the home.
Finding the Right Brightness Color and Clarity for Every Path
A path can look polished at dusk yet still leave dark gaps underfoot. Set brightness by measuring the light that reaches the walking surface, then judge the result after dark. Lumens describe fixture output, while illuminance describes the light received by the ground. Beam spread, mounting height, spacing, paving color, and ambient light all change the result.
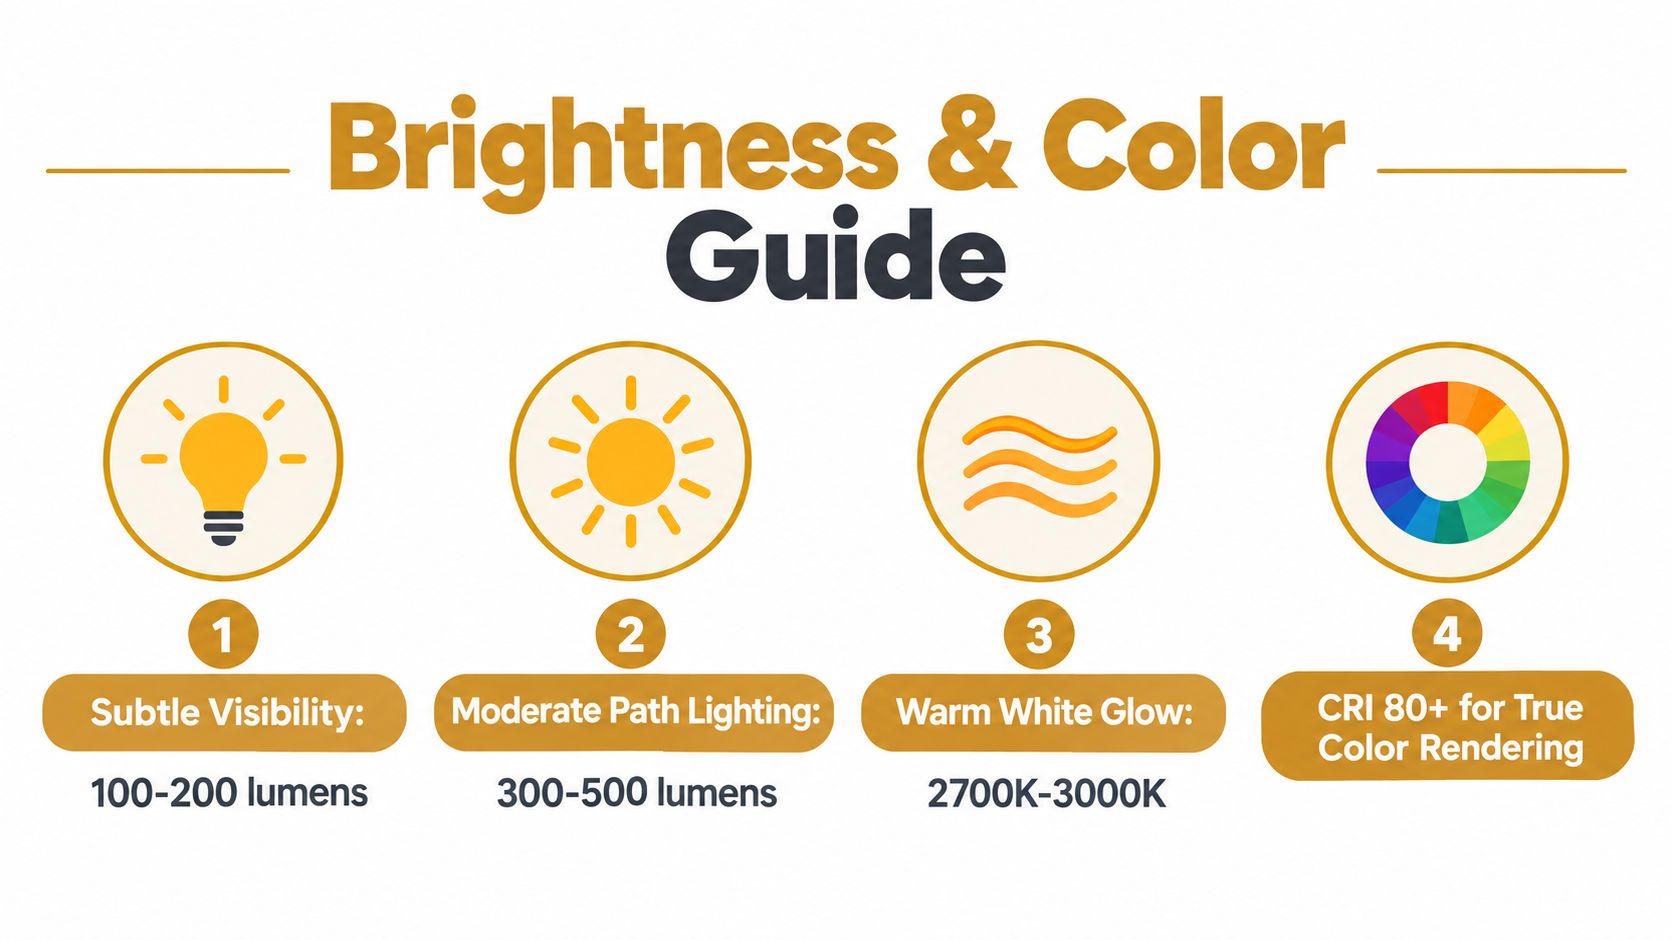
Compact residential path lights often produce 50 to 200 lumens. The cited 270 lumens at 2 watts provides a useful comparison for a more defined beam, but output alone does not determine comfort or safety. A fixture aimed across pale paving may appear much brighter than the same fixture aimed toward dark planting.
Use warm color with consistent rendering
Warm white usually fits residential paths well, supporting a calm connection between stone, timber, planting, and warm exterior finishes. Contemporary guidance commonly places this choice around 2700K to 3000K, particularly where the walkway leads toward a warm porch or aligns with the interior view.
Keep color temperature consistent along the route. Combining a warm fixture with a noticeably cooler one can make even a well-spaced walkway feel disjointed. Use a deliberate color change only when the lighting marks a separate outdoor zone.
Color rendering index, or CRI, describes how naturally materials and colors appear under a light source. 80 CRI is the general industry minimum, while 90+ CRI is reserved for color-critical spaces, as noted in this path-light product guidance. Every Golden Lighting LED fixture already exceeds that industry floor, which is why foliage, stone, and masonry along a path keep their true color instead of reading flat or slightly gray. Higher CRI can make faces, foliage, masonry, and premium finishes appear more natural.
Design for even illumination
The Illuminating Engineering Society's pedestrian-area guidance is commonly used to assess path lighting. It identifies 1.5 foot-candles average horizontal illuminance as a reference level, rising to 3 foot-candles near architecture or waterfronts and 4 foot-candles for general circulation paths. Typical uniformity ratios range from 10:1 to 5:1, depending on the zone. Use these figures as design checks, not as a reason to install the brightest fixture available.
Spacing should follow beam spread. Wider beams can cover more ground with fewer fixtures, while narrow beams need closer placement and careful overlap. Aim for useful consistency from one pool of light to the next, rather than a repeating line of bright spots and deep shadows.
Local requirements may also apply. Some codes specify at least 1 foot-candle in parking-lot areas and 0.1 foot-candle minimum average illuminance for egress paths. A walkway serving both everyday circulation and emergency access should be reviewed against the stricter applicable rule.
Design decision: More light is not automatically better. A lower-output fixture with controlled overlap can guide feet more comfortably than a bright fixture surrounded by deep shadow.
Dimming and layering provide control after installation. Run the path at a gentle evening level, then let a porch light, wall sconce, or planting accent provide supporting ambient light. Avoid over-lighting and mismatched color temperatures, because both weaken the quiet, modern character of the design.
Power and Installation Options Made Simple
Power selection shapes reliability, maintenance, and the amount of installation work. A 12 V low-voltage system is a practical fit for many residential paths, especially when the transformer can reach the route without complicated cable runs. Solar fixtures can simplify placement where trenching is difficult, but performance depends on exposure, weather, battery condition, and the amount of evening use required.
Higher-end linear systems may use 24 V or 48 V, particularly where a continuous in-ground line or longer architectural run calls for a specialized approach. These systems can deliver a refined result, but drainage, cable planning, access for service, and exact fixture integration deserve professional attention.
Plan the system before placing fixtures
A straight walk from a suburban driveway to a porch is often suitable for a careful DIY installation. The homeowner can locate the transformer in a protected, accessible position, route cable along the planned path, leave service slack at each fixture, anchor fittings securely, and adjust aiming after dusk.
A curved garden path with steps demands more judgment. Cable runs may branch, fixtures may need closer placement through elevation changes, and roots or drainage zones can complicate digging. A qualified installer should handle work that involves difficult terrain, code-sensitive connections, extensive hardscape removal, or a system that must serve several zones.
Transformer location and cable routing determine how well the system performs over its lifetime, not just how easy the install is. The transformer should remain accessible for adjustment and protected from standing water, while cable routes should avoid locations where future planting or edging work could damage them. On longer runs, voltage drop is the detail DIY installers miss most often: fixtures at the far end of a run fed from a single, distant transformer will measurably dim and shift color compared to fixtures near the source, and a drop above roughly 10% is enough to make an otherwise coordinated system look uneven. Centering the transformer relative to the run, or splitting a long run into two shorter ones, keeps color and brightness consistent end to end.
Choose components for exposed conditions
Weather resistance isn't a decorative specification. Water entry, corrosion, loose connections, and shifting fixtures create more maintenance than the original installation saved. IP65 or better is a useful benchmark for exposed luminaires, paired with corrosion-resistant housings and stainless hardware where conditions warrant it.
The U.S. Department of Energy's LED Adoption Report found that LED installations across all applications more than quadrupled between 2012 and 2014, reaching roughly 215 million units — with area and roadway lighting alone accounting for 5.7 million of those installations by the end of 2014, according to the DOE LED Adoption Report summary. Pathway products often sit within that same exterior lighting ecosystem, so the shift illustrates how quickly LED technology became established in outdoor applications.
Golden Lighting's wet-rated outdoor lighting guide provides related guidance on fixtures exposed directly to weather. The lasting value comes from engineering the complete system, not just buying attractive heads. A stable transformer location, protected connections, suitable materials, and accessible service points will matter long after the first evening glow.
Bringing It All Together for a Welcoming Modern Yard
A contemporary path feels finished when its fixtures, spacing, and architecture follow one visual language. Start with the walking surface, then use planting and hardscape for depth. A restrained tree uplight or soft entry glow can support the route, provided the guidance light remains the clearest cue.
Use measurable checks at dusk. Set illuminance high enough to reveal steps, curves, and surface changes, then compare readings along the route rather than judging one bright pool. Keep the gap between the brightest and darkest points controlled, with a practical uniformity ratio that prevents visitors from moving through alternating glare and shadow. Spacing should follow each fixture's beam spread, not a fixed rule. Wider beams can cover more ground, while narrow beams need closer placement.
Review sightlines from the street, walkway, front door, and nearby seating. A discreet fixture from one angle may shine toward a patio or neighboring window from another. Shielding, accurate aiming, and selective planting can reduce glare without taking useful light off the path.
Build a system that stays composed
Seasonal growth changes the result. Shrubs can block a beam, mulch can bury a fitting, and shifting soil can tilt a bollard. Keep the maintenance routine simple:
- Clear the optics: Remove dirt, leaves, and irrigation residue from lenses and shields.
- Check alignment: Straighten fixtures after storms, frost, gardening, or settling.
- Review planting: Trim growth that blocks the path or sends light into unwanted areas.
- Inspect connections: Look for moisture, corrosion, or exposed cable before small issues spread.
- Reassess brightness: Adjust output when porch, wall, or architectural lighting changes.
A large North American market reflects strong demand for outdoor guidance, but homeowners gain more from modest, controlled systems than excess equipment.
The practical standard is usability. Guests should see the next step without searching, the architecture should remain visible, and fixtures should stay quiet in the view. Golden Lighting's Outdoor Lighting collection and outdoor lighting maintenance guide cover finish options and upkeep for coordinating exterior lighting with the home.
Set the target level, mark curves and elevation changes, test temporary positions at dusk, and compare fixtures by beam control, weather resistance, color temperature, and service access. Then review Golden Lighting's Outdoor Pier & Post Lights collection and outdoor post light installation guide before installation.











Share:
UL vs. ETL: What Certification Actually Tests, and Why Indoor and Outdoor Fixtures Differ